The 2026 Sidecar Rally registration is now open! Click here: USCA 2026 Rally Registration Form
Posted by: @ben-franklinNow, what would I do? Since you have a spare head, I would pick option 1 or maybe 2 and probably ride the hell out of it for a real long time.
Thanks, Ben. I'm leaning towards your option 1 also. I belong to the Concours Owners Group (COG) and have been posting pictures and my dilemma on their forum too and most of their comments kind of lean towards your option 1 also. But, if at all safely possible, I'd kind of like to stick with my existing head also since I know it's good except for that one valve.
If the eBay head checks out nice, I'd use it, and be done.
Mount the old valve on a nicely stained piece of wood, and hang it up in the shop to commemorate your hard work. Put it over the door into the house, and you can salute it each time you go in.
Hold my keyboard and watch this! 🙃
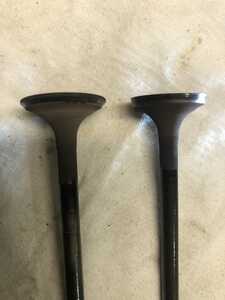
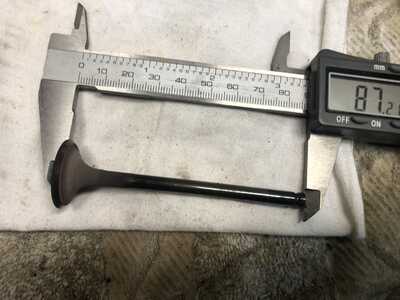
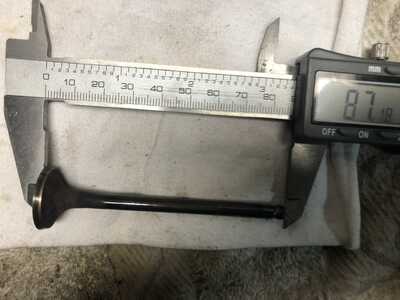
Here's the good valve (left) and bad valve (right) as a poster on the COG forum suggested that I show. The other two pictures show the total length of each valve, which are the same lengths.
I put the good valve in the bad valve's position and installed the springs and keepers. I didn't try to lap it at all. I then turned the head upside down, leveled it some, and applied a pool of kerosene all around the valve face. It didn't hold and seeped through to the other side.
So, I think, as some of you have suggested, I'm going to just go with my eBay head. The eBay seller, The Motorcycle Guys Salvage, told me that head was off a bike with 7,691 miles. His seller's page says he has sold 287,000 (!) items on eBay and has a seller feedback of 99.6% positive. So, I think I can trust him pretty good as far as being an online used parts vendor. A friend of mine has a small machine shop. He's not set up to resurface that head, if needed, but he said he does have the equipment to verify if the surface is flat. So, I'll try to get it over to him this week to take a look. I'll do a leak check on all the valves with kerosene or some other liquid. If it passes that I don't have any concern about not replacing the seals with only 7K miles on this head.
Am I thinking right? Any other suggestions, advice from you experts?
Your friends "eyes on" will most likely be the best advice you can get. I'd follow his recommendations.
Unless he tells you to bring a large bat bag full of unmarked $20 bills, alone in the middle of the night, I'm betting he'll get you setup for success. 👍
Hold my keyboard and watch this! 🙃
@floyd-h Yep, sounds like a plan. There is quite a lot of carbon on the valves from the old head. Probably less on the ebay head.
If it is reasonably flat and the valves hold kerosene, you should be good to go.
As a mechanic, disclaimer, a lazy one as of late. I would go with Option one. But at minimum, test the used head for leakage the same way you did the Old one.. The suggestions to have it gone through are valid but maybe not necessary. Depends on if you want to spend money up front or spend it doing the job all over again.. Never enough time and money to do it right, always enough to do it over kind of thing.. In my opinion the old head is junk.. it might be salvageable but it will need at best, a good valve job by a good machinist. More than likely it will need a new valve seat installed. From the look there is nothing left of the seat. New seats are pretty specialized work and not every machine shop can do it properly. Ask how I know that.. :(. Part of that, do it over, and not on the customers dime. ![]()
Posted by: @mgv8As a mechanic, disclaimer, a lazy one as of late. I would go with Option one. But at minimum, test the used head for leakage the same way you did the Old one..
I've decided to go with option one also.
My machinist friend looked at the eBay had last Friday to check it for flatness and pronounced it VERY FLAT. I didn't have time to do a leak check before heading out of town on Saturday for two weeks. I won't be back until Feb 29. I'll update you after that.
I also intend to replace the timing chain while I'm in there, even though my bike only has 29K miles on it.
I'll see y'all after the 29th.
Finally back in town and finally had time to do a leak check on my eBay head today. I filled each exhaust and intake port with kerosene and let it set for a few minutes. Exhaust and intake valves were dry as a bone on the other side. I ordered the gaskets I'll need and a new timing chain today. Those should be in by next week. In the mean time I want to install my new Oxford heated grips, clean up some wiring, and put in a central fuse block. I've also got a 3.75 gallon auxiliary fuel tank I'm going to mount on the luggage rack. I also have a steering damper ordered that I'll put on for better low speed handling. So, I've got plenty to do before and after I get the new head installed. I just hope I have it all done by the time decent riding weather hits Illinois again.
Really appreciated the Oxford grips on my last bike. 👍
I see they've come out with a new version that might be pretty epic. https://www.oxfordproducts.com/motorcycle/brands/oxford/handlebar_accessories/hotgrips_pro_adventure_integrated/
Hold my keyboard and watch this! 🙃
Posted by: @scott-hReally appreciated the Oxford grips on my last bike. 👍
I see they've come out with a new version that might be pretty epic. https://www.oxfordproducts.com/motorcycle/brands/oxford/handlebar_accessories/hotgrips_pro_adventure_integrated/
Posted by: @scott-hReally appreciated the Oxford grips on my last bike. 👍
Yes! I’ve got Oxfords on my KLR rig too and really like them. Especially like the auto shutoff feature. That new model does look even better.
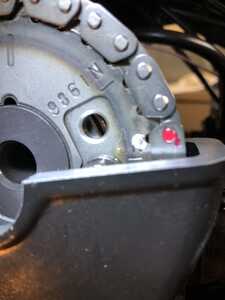
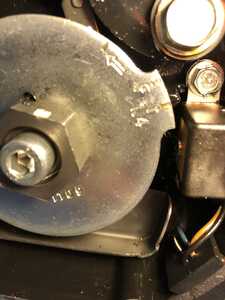
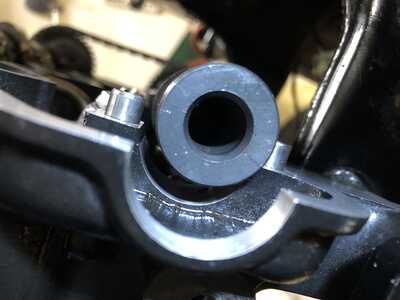
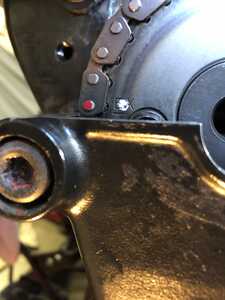
I haven't forgotten all of you and hope that all of you who have offered very helpful advice on my original valve questions have not forgotten about me. I think a few of you are familiar with the first generation Kawasaki Concours so I'm especially relying on your advise. I've finally got my "new" eBay head on and carb bank installed. (Hate dealing with getting those carbs off and back on) Now I'm trying to get the camshafts set in the right position and want to make sure I've got it all correct. I've got the camshafts set in position with the timing chain on the sprockets, but have not put on the cam caps yet. I set the timing rotor to the 1.4 mark (pic #1) My Clymer manual says to set the camshafts so the IN and EX index marks align with the top edge of the cylinder head. Then locate the first cam chain pin that aligns with the exhaust sprocket EX mark. Then count 35 pins towards the intake sprocket. The 35th pin must align with the IN mark on the intake sprocket. I did all that and marked the #1 and #35 pins with red fingernail polish. As you can see in the pictures the #1 pin lines up exactly with the EX mark (pic #3), but the #35 pin is just above the IN mark (pic#2). The IN mark is more in the middle of the link and not aligned with the 35 or the 36 pin. Also the exhaust camshaft does not sit flat in the journals. The end opposite of the sprocket tends to stand up (pic #4). Prior to putting the chain on the sprockets it would sit flat. Is that just because I have not put the caps on yet and torqued them down? If you need more pictures or explanation as to what I've done please let me know.
Floyd, if I may offer an Easter Sunday quarterback opinion on what I see, after reading your post. I believe you are correctly timed.
I personally would not have installed the carbs, until after completing the camshaft installation and valve gear timing.
However, I believe that the primary issue with the camshaft not sitting flat into the journals, is because the cam lobes need to compress the valve stems.
Using assembly lube, or at a minimum using new clean engine oil on the camshaft, and in the journals, GENTLY tighten the camshaft caps, in correct order, to seat the camshaft into the journals, so that the camshafts are fully seated.
If the timing chain is still in place, using a large socket, slowly rotate the crankshaft a 1/4 turn one way, then a 1/2 turn back the other way. Then...a 1/4 turn back to where you began, so that the timing marks line up again.
In those small rotations, did everything FEEL smooth ? Meaning, no valves hitting anything.
If you believe that you have the camshaft correctly installed, and rotating smoothly, then....look at direction of engine rotation....then rotate the engine, via the crankshaft by hand, in the opposite direction of correct engine rotation....just a 1/4 turn backwards.
Now...rotate the engine forward that same 1/4 turn, back to the correct timing marks, as you have now removed any slack in the timing chain, and now look to see exactly where your prescribed timing marks are.
I think you ARE going in the right course of action with this engine.
If all is correctly timed, properly lubed, and correctly installed, you can now rotate that crankshaft by hand as many rotations forward or backwards as you desire, proving that smooth rotation of all moving parts is there, and you will be good.
Sent from Nuremberg, Germany, inside the Old Walled City.
Two Million Mile Rider
Exploring the World in Comfort
Thanks, Miles. I'm in the garage now and ready to start following your tips. I'll let you know how it goes.
BTW - Hope you're enjoying Nuremberg. I was in the Army and stationed in Mannheim in 1984-87. We visited Nuremberg several times. Fascinating city.
Floyd, remember....oil that cam and the journals, before tightening things down. Slow and easy does it.
I'll be closer to Mannheim tomorrow, as we get to Heidelberg tomorrow, and spend the next 2 weeks in that area.
Two Million Mile Rider
Exploring the World in Comfort
- 29 Forums
- 11.8 K Topics
- 93.3 K Posts
- 3 Online
- 5,605 Members
