The 2026 Sidecar Rally registration is now open! Click here: USCA 2026 Rally Registration Form
Yes suspension is handy and good is better.
The length of your piece of string requires measurements and calcumalations.
Not sure who over there specialises but somebody will know a guy who knows.
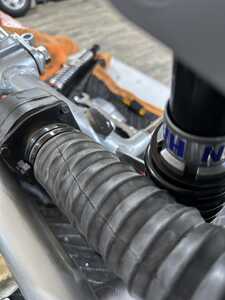
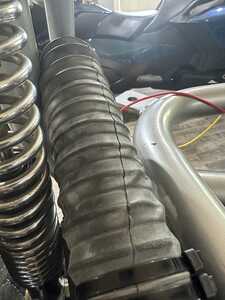
There are a lot of shock available in this size ! Just make sure of the external (diameter) of the body/spring (or that there is space for a larger one): I just had this problem with my FS3: modern shocks are too large and rub the body/frame etc. I had to find what looks like an old Japanese one to fit in there ! Pic of my new Hagon rubbing:
compared to the old Honda(?):
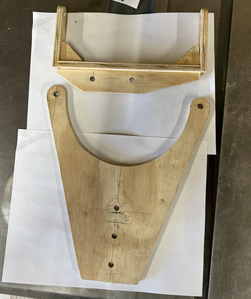
So progress is being made. After a boat load of research and finding some nice articles with details about how leaners work and design concepts I have designed and am building my mounts, first out of 1/4" plywood to make sure everything fits before I bring the mount drawings to the fabricator to build. This been a lot of fun researching and getting comments back from folks on these types of sidecars.
For the shock I most likely will find a good used one of the same length, but maybe with some real adjustments, compression and dampening as well as some netter preload adjustments. The one that came with the car only has a stair step for preload, not much use.
Oh well that is today's update. Once I get the mock ups mounts done I will post a couple of pictures.
I am trying to add some text and a file attachment and I get this message. Thoughts
Access Denied - GoDaddy Website Firewall
The file may have a link to a suspicious site embedded and is getting excluded. We’ve had to put security settings pretty high to protect the site.
If the file is mostly text, can you remove hyperlinks and turn it into plain text? It’s odd how many things have quieted hot links inserted that can allow access to a variety of tracking and malware.
Illegitemi non carborundum est!
Here is a drawing of the motorcycle sidecar mount. I have a motor Guzzi V85TT and the alternator is on the front of the engine. The front mount is designed to bolt to the lower front engine mounts and wrap around the alternator, the rear mount will attach at the center stand mounts. Hi here will be a stiffer bolted between the from at rear mounts.
The front mount has 2 lugs/bosses, the lower is on center with the rear center lug and will be used for the stiffener. The upper will provide a 5.5 degree offset for the sidecar swivel attachment. The rear lug to the left is 2” offset from center but on the same plane as the stiffener mount.
I have made plywood mock ups of both mounts and have held the front in place by hand. I need longer blots to mount the front and I need to remove the center stand to and to get some bolts to mount the rear. I have tried to keep as much clearance as possible while still allowing for oil change maintenance. The stiffener will be nearly up tight against the exhaust.
Materials will be either 3/16 or 1/4” steel plate for both front and rear. 1” heavy wall tubing for the stiffener.
I have had to stop work around 10 or 11 AM as it gets too hot in the shop to work. So progress is slow.
Thane, It didn't like the .png file. I used a .jpg in the last post
An actual drawing?
What next?
It will be interesting to see the affect the offset has.
Probably minimal and likely unexpected.
Always wanted to vary the front pivot height to change the amount of turn at the sidecar wheel.
One thing about that is the amount the chair wheel turns depends on the lean angle of the bike.
Yes?
But the radius the bike turns at a set lean, depends on the speed it's travelling at.
Hard to make the sidecar track exactly as the bike does.
Mind with a 6 axis sensor and a genius with computers.
It would be possible to program an electric power steering unit to do just that.
Your mission if you should choose to accept it.
Just waiting for the day.
Good progress has been made, I was able to get my mock ups of the sidecar mounts installed. I did have some difficulty removing the front 2 lower motor mounts. I always get nervous when I have steel bolts and blind aluminum holes. The bolts were very difficult to turn. I used a 1/2" breaker bar on one and it would not budge. After some work I finally got them out. It seems how ever installed the crashers on the bike use a thread locker on the bolts. But all is good now. The front mount went in an bolted up as designed.
The rear mount was designed to use the center stand mount. The hardest part there was getting the spring off the center stand, a ratchet strap worked just fine. The frame mounts for the center stand are very stout, I am thinking 10mm thickness. Once the rear mount was mounted I felt that some redesign was in order. I made it a little wider and decide 1/4" plate would be best.
Question: For the front and rear lugs/bosses where the heim joints will mount, should the holes be straight thru with a nut on the backside for the bolts or should the lug/boss be threaded? Also my plan was to use 5/8" grade 8 bolts for the helm joint. Thoughts?
I am going to try and get by the fabricator today or Monday and drop off the prints for an estimate.
Here are the plywood mock ups. Changes have been made since I made these but in general they are what I need and they did their job. Easier to change wood than steel.
A funny thing my intent on this project is that I would not have to buy more tools, like a welder. Things like this I sold 5 plus years ago when the wife and I sold everything and hit the road in the RV hauling the MC's with us criss crossing the country on our retirement adventure. And I mean everything accept the cloths on our backs a few precious things, some tools, etc. Now that the RV is gone and we bought another house I now have a full wood shop again and it looks like I am getting back into metal work.
I live in an area where there aren't a lot of services so I am somewhat limited as to finding someone to do some welding fabrication. I found a fabricator and brought the drawings to him yesterday to get an estimate and eta. The guy look at the drawings and started talking about what it would take to build the mounts for me. He talk about having to buy a 4 x 8 sheet of steel which is a special order, and how he would have to draw it up in CAD for the CNC machine, and on and on. Then how much the powder coating would be, and about this time I am thinking he really doesn't want to make the mounts.
Well I was right, so I hope you are sitting down. He said $3800 and two to three days. I looked at him and asked if he looked at the dimensions and said you know those are in inches. I don't know why some folks just can't say no I don't want to do this instead of insulting customers with absurd quotes. So now the hunt is on either find another or JUST BUY MORE TOOLS.
FWIW; I did the same thing. Actually three times. Recently purchased a new welding setup, which is getting used for more than just the mounts on the new sidecar build. Biggest surprises were the new (to me) helmet technology (Lincoln 3350), and the cost of bottles (C25 & 100%Ar). Third on the list was the new IGBT welder with soft start and post flow (Primeweld Mig180).
The new helmet makes seeing the puddle, heat signature, and material easier than when I had strong young eyes. Very glad to have made this purchase. The soft start and post flow of the IGBT welder made it easy to get some skills back. I live in oil country, and there are several vendors for welding supplies and gas. The guys at Airgas gave me a veteran's discount on the gas, which was very nice. Bottles were still spendy, but so is everything in Utah.
After not welding for several years, my welding sucked. So I purchased a bunch of practice kits from JFLF.org The kits were cheaper than if I'd bought and cut a bunch of metal myself. Gave plenty of opportunity to refresh each skill one-at-a-time. They also have some fun artistic kits, and some awesome books.
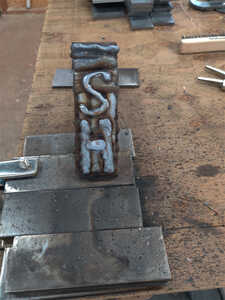
First attempt at stringing beads horizontal on a vertical surface. Poor work should be initialed. 🤣
Hold my keyboard and watch this! 🙃
Posted by: @scott-hFWIW; I did the same thing. Actually three times. Recently purchased a new welding setup, which is getting used for more than just the mounts on the new sidecar build. Biggest surprises were the new (to me) helmet technology (Lincoln 3350), and the cost of bottles (C25 & 100%Ar). Third on the list was the new IGBT welder with soft start and post flow (Primeweld Mig180).
The new helmet makes seeing the puddle, heat signature, and material easier than when I had strong young eyes. Very glad to have made this purchase. The soft start and post flow of the IGBT welder made it easy to get some skills back. I live in oil country, and there are several vendors for welding supplies and gas. The guys at Airgas gave me a veteran's discount on the gas, which was very nice. Bottles were still spendy, but so is everything in Utah.
After not welding for several years, my welding sucked. So I purchased a bunch of practice kits from JFLF.org The kits were cheaper than if I'd bought and cut a bunch of metal myself. Gave plenty of opportunity to refresh each skill one-at-a-time. They also have some fun artistic kits, and some awesome books.
First attempt at stringing beads horizontal on a vertical surface. Poor work should be initialed. 🤣
This is good to know thanks.
My last full-time job in a metal fab shop with more site work as time went on. (start of 2005 till the end 2015)
Any ways the boss said he made a nice table for a lady who proceeded to change her mind.
Asked if it could be made smaller and how much.
$1000 he said to put her off.
She had more money than sense and said yes.
He went and bought some of the 1st 1mm thick 5 inch cutting disks.
An hour or so latter and he had a very profitable morning.
Why do I say this?
What your doing can be done with a drill press (or cordless hand drill)
Some drills and maybe a ɓimetal holesaw for the larger inside radious curves.
The afore mentioned 5 inch grinder ( it's my most used tool)
And an old school stick welder.
I have 7 welders sitting in the basement now.
The last few were free either given or rescued from rubbish collections.
1 is junk that works from the farm that I keep for sentimental nonsense.
It is probably worth a few dollars as scrap due to its copper coil.
Still my fancy inverter tig is OK but a steady hand and good rods will do what you need.
And some scrap steel.
If there's someone nearby that needs a cheap welder let me know.
@brstr in my world, the kind of solution your boss came up with is what I like to classify as “old age and treachery.”
Illegitemi non carborundum est!
Well I suppose.
And never managed that sort of profiteering when self employed either.
But he took on a modification job that could have been a start again from scratch operation.
Then got lucky when the new technology in the form of 1mm cutting blades saved his bacon.
And they changed the fabrication game for sure.
No more taking an oxy set to fix onsite stuff ups.
Which is my point.
Another way to make smallish shapes is to find a laser cutting service.
Send them the plans in the correct format then get the pieces freighted.
That's a bit of theory on my behalf.
- 29 Forums
- 11.8 K Topics
- 93.4 K Posts
- 3 Online
- 5,606 Members


