Hi.
I'm building my Uralish/Dneprish lightweight bike called "Jura 250cc" (Jura is "lightweight" mountain range in Poland). http://grzegorski.net/wiki/doku.php?id=moto:pannonia_budowa
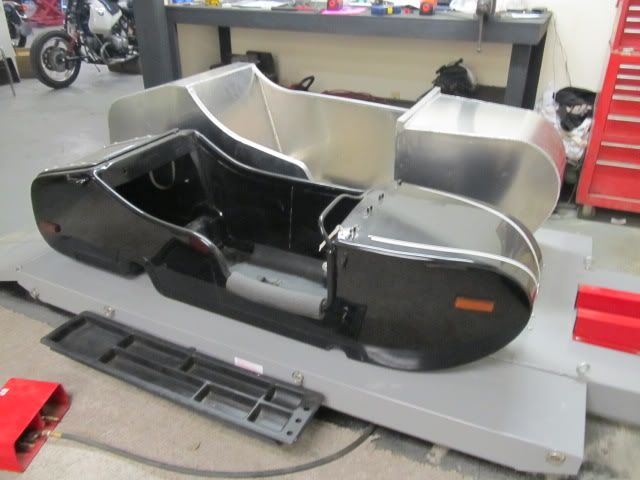
I bought some good mixed sidecar for my - Izh/Sputnik frame with Velorex 562 fiberglass body. But The body will be used in my brother's new hack attached to this bike:

Velorex body fits much better to this blue Romet than to my Jura.
Jura looks like that:

Now it's black, doesn't have the double gauge and this "Iroquois/punk hair" ilcense plate on front fender, and the front fender is placed higher.
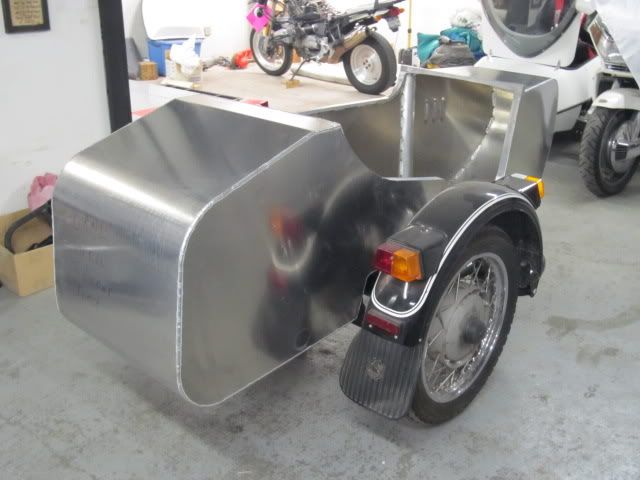
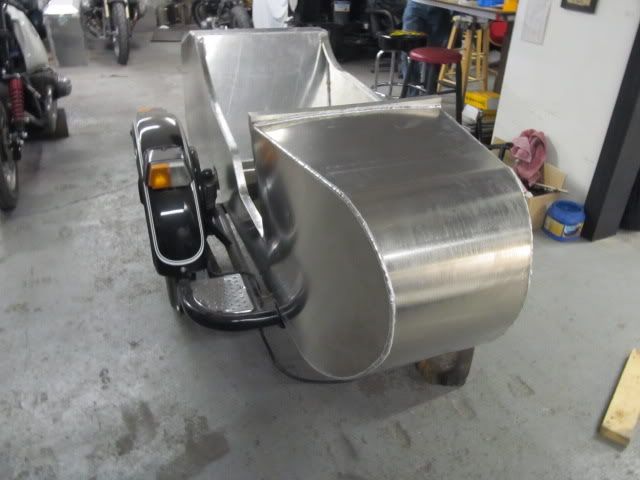
Sputnik's frame is visually similar to Ural sidecar's frame and I'd like to fabricate a fiberglass lightweight body for it. It doesn't need to be exact copy but has to be "in the same style", made of 4 sheets of material and with such cut in right side, with these pipes etc. But trunk will be accessed as in Dnepr, behind the seat, without lid. Ural sidecar's body can be made from straight sheets, bent in one direction each. So I need any drawings of Ural/Dnepr sidecar's body, to make "big papercraft". Be it a 3d model for Blender, CAD drawing, some artwork, hand drawings of unwrapped shape, any thing that can help me modelling my pseudo Russian body.
Something like this SUM sidecar:

Is unwrapped to such grid:

And I want to do the same with Ural's body. Just like David's work ( http://www.advrider.com/forums/showthread.php?t=660193 )
David's work compared with original body:
And this is my target - something similar to original. As You see it's simplified (and enlarged too, but it isn't the matter).
Does anybody have any material, drawing, sketch that can help in my project?
All looks good! I like the lines of your bike, very classic sort of vintage look. Should be great for a hack! David's is very nice too, fine workmanship!
If all else fails you can make a scaling tool to accomplish your goal. Takes time and a bunch of white wrapping paper from the meat market. Make up a wooden stick about as thick and similar to an ice cream stick and 30 cm / 12 inches long, with a nail or screw through one far end. Blunt or round off the point on nail or screw.
At other far end fasten a small block of wood to stick and bore a hole through about the diameter of a pencil in the same direction as screw or nail passes through at other end. Also drill crosswise on wood block at center of this pencil hole. Slide a pencil through hole with lead sticking out on same side as the blunted screw or nail tip at other end. Insert a screw through the second hole you drilled to press against pencil and hold in place.
Find a picture of what you want and get a piece of larger paper. Trace along outline of picture with screw/nail end of new tool on outline, and with pencil at 90* angle, or as far away from line you're tracing as possible. With your new tool you keep the same distance away from picture outline all the way around and have now made a much larger exact copy of original by 30 cm or 12 inches. Do the same again with the traced picture and keep going until you get to the size you want.
Takes some time but it works just fine. May want to make your tool adjustable if you want to get to exact scale. There you would take an actual measurement off a full sized hack and adjust tool to copy from picture to that desired size.
I know this drawing tool, we had to build it in primary school, fortunately I'm a "pre-internet era" child 🙂 I could also use CAD - paste the picture into one layer and try to fit lines and arcs to picture, then rescale everything to what i want, then print it on 20 sheets of paper, glue them together and get some sort of template. Then cut the sidewalls from anything, eg form glass-epoxy sheets (i have a bunch of them).
But I don't have idea how to measure/draw the hourglass-shaped bottom-front-top steel sheet, not having original to measure the width in every 10mm of length. The shape is resultant of sidewalls shape and their deflection in front and I'm not a math master to calculate it. I can do the sidewalls first, place them where I like on some steel-wood-wires-zip-ties frame and then wrap some cardboard to make the front-top wall. But it wouldn't give me drawing of such shape, eg to make the same shape from sheet metal to be able to weld it. I like to have some "documentation" pictures for some of my works, eg to give it to other people. I think having fiberglass body for Russian can interest more people than only me.
Great sheet metal work on the tank.
That bike looks like it uses a Japanese engine copy.
Who makes it?
This is chinese Senke, model SK125-7 one of many variotions of SK125-7's body. Tank is the only sheetmetal part in it, fenders and underseat is ABS plastic. Tank's shape is good thought - very flat top that fits any tankbag, plus good-looking places for knees. And very comfortable to use. Frame is "strongly inspired" by Suzuki GN (not exact copy, I have both frames in worksop now). Engine is copy of Honda CG 125, but with electronic ignition. And with 100W 12V 1-phase alternator. Good, robust bike that doesn't require repairs for even 25000 miles. Then change clutch plates and go for another 25000 miles.
Seems to me, having seen your considerable skills, this method of duplicating the Ural body is an awful lot of work to get where you want to be.
If it was me I'd get some large pieces of cardboard, probably from an appliance store that was used to protect their products in shipping and most likely free. With pictures of Ural bodies to reference, it should be a fairly easy matter to sketch it up freehand directly on the carboard to whatever dimension you like. Minimal tools needed, mainly a straight edge and something to scribe circular shapes and some pencils. This will do for the vertical side profile and that will mostly guide how the top or horizontal sheets are formed. Again for the top and bottom of front it's just a very gentle curve on left & right sides that forms that indentation, if you even want that. Don't really see any reason to trouble with that myself, just some slight narrowing would do fine.
I'm sure you have what it takes as far as an eye to visualize as you go and the end result will be a product of your own taste and preference and needs.
Not sure if these would be of any help but they are pretty cool.
XLerate, I have thought about your method. Then, before gluing everything together, cover everything with fiberglass mat and resin. Then. I don't know its english name, but it's kind of "glue" that makes surfaces smooth and I can use it. Maybe not perfect like some topcoat, but smooth enough to satisfy my needs. Yuo are right - since it wouldn't be exact copy, I can simply draw from some photos. And with "cardboard paperwork" I would make both side walls almost vertical, so the front wouldn't be narrower in bottom part - not that big difference between top and bottom width like in original.
Also thought about other methods of fabricating the body. Maybe someone has some experience.
One of ideas is to make thin plywood sidewalls and even thinner plywood bottom-front-top. Stick everything with wood glue, small wooden guests, very small screws and with two ribs in fornt part and one rib just behind seat. Do some reinforcements in front-bottom part (for luggage). Then sand everything outside and cover with some resin and paint.
The other idea is to make everything form glass-epoxy sheets. But I don't have any idea how to make the junction waterproof and fine finished, because fiberglass sheets are much more strudy than plywood, and any paint or putty can crack from vibrations.
Joyce, maybe not helpful, but wireframes are always cool pictures.
One could cover the Glass epoxy junctions with fiberglass cloth and skim coat the seam area with epoxy body filler, or wrap the whole body with a layer of fiberglass cloth and skim coat.
In earlier posts there was a sidecar body formed as a boat builder would with interior wood framing forms and a plywood skin. Easier to waterproof.
Lonnie
Google 'cedar stip canoe'. That is another option for building a body and has been done with good results.
Cedar strips seem to be good option for more sophisticated shapes than "three sheets". But good to know.
Just now I thought about one of most important things. I must calculate if "tons" of plywood, resin and other materials will be significantly lighter than standard, GMAW welded, 0.6mm and 1mm steel sheet. If there is eg. 3 kg difference, all "wooden games" must wait for next ocassion.
First I need some cardboard mockup.
I typed a much better reply this morning but the forum ate it!
Stateside in the 70's and 80's there was a lot of use of Mahogany wall paneling in homes and apartments. It is single ply and 1/8" thick and was inexpensive. Also interior doors were hollow core with a lightweight frame and thin Mahogany panels as the 'door skins'. Because there's no glue like plywood has this material can be wetted and shaped somewhat. Wall panelling usually had/has grooves cut in it on one finished side but the opposite side is smooth.
If you can find it there it's one of the cheapest materials available, can be worked with common hand tools and of course it can be glued together with light 1" x 1" framework. Also the seams can be reinforced with fiberglas mat or roving, then gelcoat resin over the top.
As for waterproof seams fiberglass roving or mat with gelcoat resin over it is 100% waterproof so use this inside or outside at seams. Fiberglass and resin or gelcoat is one of the most lightweight materials you can build a body structure with. Key areas may be reinforced with wood, steel tube, angle or with aluminum and glassed over. It is the easiest to repair and if you do it right you can add color to your gelcaot so it is pre-painted! It's also commonly used to build fiberglass boats.
Our M72C, M72CX, M72D and M72DX sidecars are very similar in shape to the Ural which is also a copy of a Steib M72. Our sidecars are made from hand laid fiberglass. Some changes need to be made from the basic M72 type design the the Ural is copied of in order for the body to be able to be pulled from a mould and also have stifness where it needs be. Also we ad extra material where items like racks need to be installed. Making a good fiberglass body is not as easy as you might think. We started by making a plug out of foam, wood and what ever else we needed to get the shape we needed. We also have an inner panel on the left side to stiffen the body up.
I would not make a fiberglass sidecar as a one off. Way to much work to do it right unless you are making it out of wood or some such material and just coating it with fiberglass.
Jay G
DMC sidecars
www.dmcsidecars.com
866-638-1793
For the home builder with limited resources there are few other affordable options besides fiberglass for making a body with complex shapes. The plug foam can be glued up from small pieces scrounged from shipping materials. Only need enough foam for a few inches thickness for the outside shaping of mold plug. Interior of mold plug can be of scrap plywood to make up the empty space and basic shape to be formed. For a one-off and maximum economy I wouldn't do a male plug followed by female mold followed by 3rd finished hull or body laid up inside female mold. Instead glass directly over first male plug form. As mentioned, styrofoam base can be melted away with acetone. Takes a little more gelcoat to even out ripples in fiberglass roving this way but still far less materials and work than the 3 mold process.
As suggested earlier a light single-ply wooden form with fiberglass roving/mat and light interior wood reinforcement as needed for joints and seams, with gelcoat inside and outside would do well and be economical and functional with excellent strength. Exterior sheets can be softened with hot wet rags to bend them to shape. Sometimes knife slits are needed, crosswise to direction of bend, to help wetted wood bend into shape. The interior wooden reinforcements could be 1" x 1" soft pine, steam bent to shape.
Easy to construct a steamer box with designs shown online at wood-strip, cedar-strip canoe building sites. It's a simple rectangular box set at about a 45* angle with one open end at bottom, one end at top partially closed. Open end at bottom is suspended above the spout of a tea kettle sitting on an open flame, to direct steam into steamer box. Steamed pieces removed are tacked in place with light brads, small nails or screws to be glassed over later. They may also be steam formed and held with small nails then removed a few days later once they have their shape set. Let all thoroughly dry for a week or two and when dry, glue them back in place with waterproof glue before glassing over. Be sure all wood is completely dry before glassing over! I'd add interior metal reinforcement sheets/plates fiberglassed in place where needed to mount racks or other hardware.
For my own build I've decided to build a tubular steel frame with a metal body. The body is simply shaped with a light, small-dimension angle iron subframe for the shape, then attaching 1/8" flat aluminum sheet directly to that. I have a source for surplus new metal where aluminum sheet in either diamond plate or smooth finish is about $150 per 4' x 8' sheet, so very affordable, about 2 to 2-1/2 sheets for the whole body. Either pop rivets or small screws to attach sheeting. Should be strong, lightweight and last for decades, though my decades are mostly spent up.
.
Didn't even think about taking 3-mold process for my one-off. It's good for big series.
XLerate, can you show some photos (or link to topic about your car)?
Angle iron subframe with riveted epoxy-glass sheets could be some compromise between fiberglass and steel. And lightweight. Ural-like shape can be shaped with angle iron with some cut-bend-weld iterations that can be easily made. 1 and 1.5mm epoxy-glass sheets are affordable to me, because i can get few square meters for free (only dirty - paint etc). I also have one 1000x700x2mm aluminium sheet but with some randomly placed 4mm holes.
Aluminium sheets sounds good. But $300 for 2 sheets is 2/3 of my salary. No way... And the weight. 1/8" weighs the same as 1mm steel sheet. epoxy-glass sheets specific gravity is about 2/3 of aluminium, and 1.5mm thick ones should be strong enough.
