The 2026 Sidecar Rally registration is now open! Click here: USCA 2026 Rally Registration Form
Enfield Bullet 350 Sidecar Build
Not an Enfield but a small bike build.
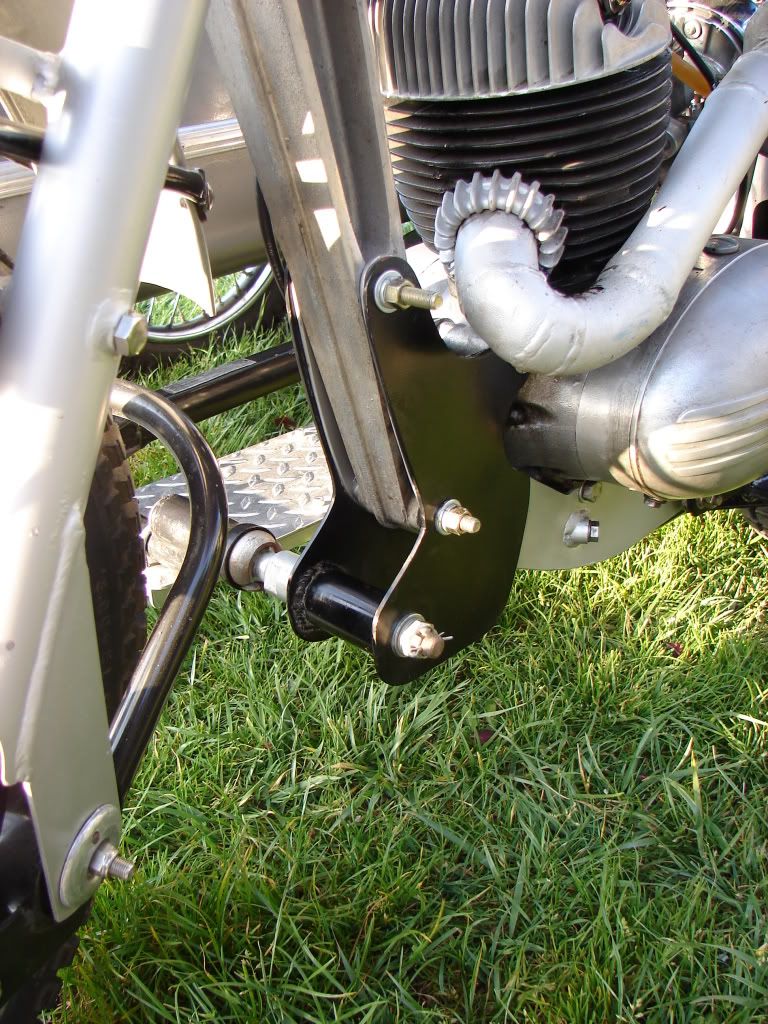
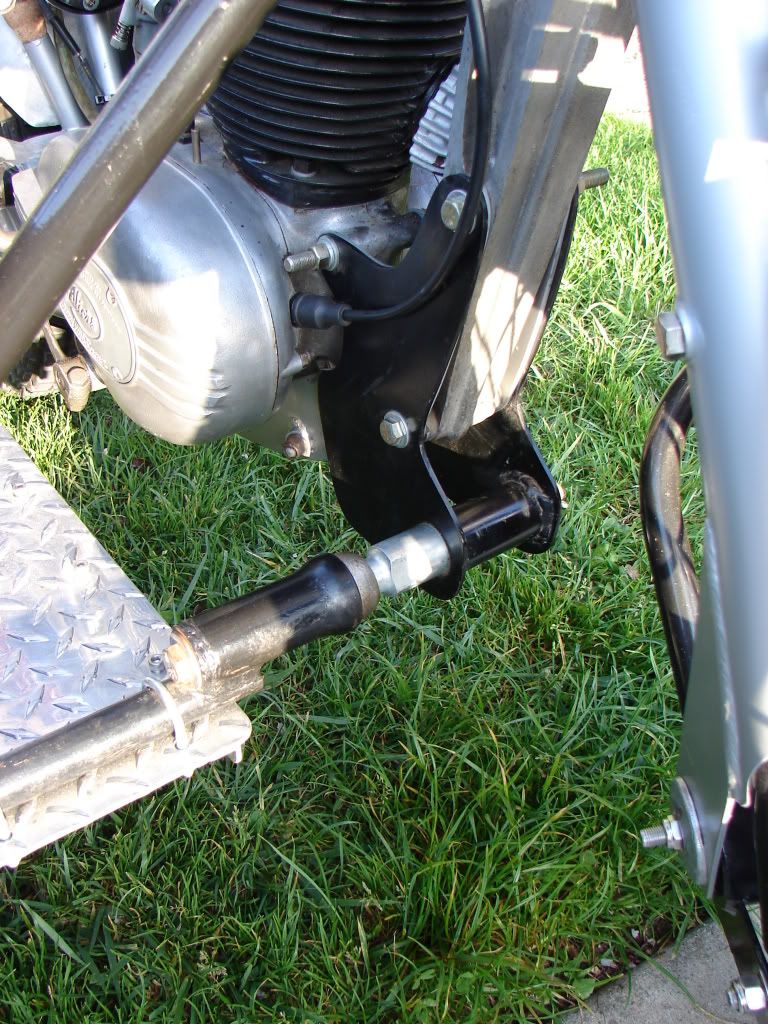
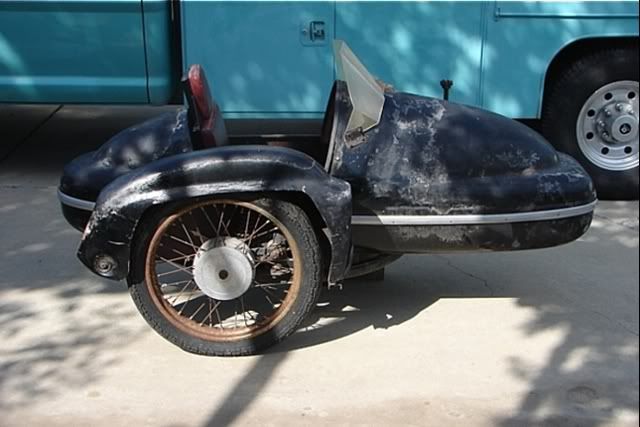
This was my 1960 Greeves /560 Velorex build from a few years back.
Took some thinking to get it all correct, still could use a few modifications.
Small lightweights are worth the effort. The power to weight ratio is hard to beat.
I'm building a larger rig for highway travel, a Zundapp 601 with a Danish ACAP sidecar.
Hope this helps in any way, glad to see others wander into the world of asymmetrical vehicles.
Don in Nipomo
ball fists as Don used are excellent!. Heim Joints as used in hydraulics work very well too.
Don't forget to make a subframe for the bike. You indian Lady will appreciate it by not twisting the bike frame.
I have been thinking about a few of the comments made on here and thought I would run another idea by you all. I am thinking of making one rail that will run along part of the length of the bike and have it attached to the frame in 3 places (Marked as A,B and C in the picture). After building the rail and checking clearance I would then be able to integrate a sub frame of sorts. I would then like to have the brackets for the Heim joints to tie into the 2 points marked D and E in the photo. I also think I will reduce the size of the chassis and look into building the body out of a light ply wood and fiber glass skin??? And I have the day off on Monday so 1st step will be getting the rail mounted up (Unless any body thinks it is a bad idea).
I do have a lower rear strut, some of the pictures were taken before I had it attached.
There's no way it would work without it. Here's another shot that shows it in place.
I welded it up to the Greeves footpeg/brake lever assembly.
Your subframe idea using those points (A,B,C) would work out well.
If you could sandwich the Enfields frame with 1/4" flat stock on each side it will be that much stronger and protect the bikes frame.
Start out with cardboard, then move on to masonite until you have a workable template. A little blacksmithing and you'll have a nice mount.
I'd keep my eyes open for a Velorex frame, save you a bit of work building your first rig.
Don in Nipomo
Cheers for the further pics Don. Just another question while I am thinking of it. What is track measurements for your outfit? I am looking to make mine about 1200mm (48 inches).
I would really like to buy a ready made Sidecar chassis and modify it to fit my requirements and I have been looking for the last few months. The hard part is in Australia is an average road bike is around 600-750cc so all of the sidecars I see for sale (and the number is not huge) are larger heavy units. I have extended my search to look for off road trials type sidecars but have unfortunately had no luck.
I really had my heart set on this unit and was getting ready to drive the 20 hour round trip to pick it up but unfortunately the seller removed it from sale. I have stopped looking at ebay in the U.K as it was just making me sad lol
Don you did a fantastic job restoring your Velorex!!
Well I got out into the shed today and made a little bit of noise. I managed to cut the bottom rail and weld on the bracket to pick up the foot peg bolt. I have a couple of ideas on how I am going to pick up the pillion peg but that will be another thing to ponder for a day or two!
Get my engine parts back from the machinist tomorrow so I will be playing with the motor for a few days and then back to the hack build.
A small trick. As Your frame is without load. with some load fasteners You could tie down the suspensions to their normal riding positions for to locate the main beam into a horizontal position When You finaly will be sitting again on Your Indian Lady...Right now together with the main stand the bike frame is somewhere random in the air and not at all in normal riding position.
As for to recall former times in a US company I used to work for once upon the time: "First Steps first!" Otherwise You will get ugly surprises.
Sven
44" wide measured on the contact patch. I left 12'' between the tub rail and the foot controls on my bike... don't want any boots getting stuck.
I wanted to make sure the latitudinal axis was less than the longitudal. Don't want the width controling the ride.
You're setting up an outrigger here, the main two wheels set the course, the third is along for a ride.
Sort of a wounded airframe with only one wing and you've modified it to fly reliabilty.
Measure out your wheel base or axle center length, divide it in half or so and then select the two lower mounting points location equidistant - front to rear.
Doesn't have to be exact but you do want to achieve some balance. It's all a great compromise.
Stiffer shocks as Peter says, or you will wallow like you've never wallowed before when the tubs weight shifts over to the tug.
Stiffer and maybe a tad longer if you plan on any spirited romps. Sidecar shock also, it all has to work as a unit.
I used a pair of Girlings off a BSA B50MX. They don't get much heavier and they have larger diameter shafts.
Where was your Enfield manufactured?
Don in Nipomo
Cheers for the measurements Don. My Enfield was built in India. When ever I take it to a show I always get asked "Is it a real one?" my answer is always "Yes it is a Real Enfield of India" (As the company was then known) LOL I am very particular not to call it a Royal Enfield as that was the name of the British company and the name the Indian company started using in the early 2000's.
I have got a little bit more done on the build. It took me a lot longer than I expected to tie the bike down and get all of the levels I needed but as I am a one man operation I am just taking my time.
23 years in my machine shop rebuilding tool machines and most of it alone, you learn how to manage loads and tasks.
Some theoretical investigation, tricks, finger tip sence, patience and comon sence. that'a all its about. You'll get it right.
Get her leveled in her normal riding position, so inflate the tires, tie her suspension down to the measurements of your rider weight and level the sidecar with what ever You have on hand (I used the bike frame as reference), then take your measurements on a reliably flat surface and write them down where You will not loose them.
Until now You should start to dismantle.
Good luck
Sven
Sven I really love your Jawa.I have promised my self that my next bike will be a two stroke. I wouldn't mind keeping the Indian theme going with a Yezdi of some variety but I do have a bit of a soft spot for the old Bajaj Chetak.
Well here are a couple of pics of where I am up to. I still have another point back to the bottom bracket of the frame to make but that is going to take a little bit more thinking. At the moment the Bullet is my only form of transport as I hit a kangaroo in my car so I am going to leave the current subframe on the bike just to see if it clears all necessary points.
Hello Gavin,
You have lot of lever and twisting in Your frame. and the owen pipe clamps are the worst thing You can do to Your main frame.(it will collaps)
Go close to the main frame, tie to the front engine plates. As many junctions and short distance connections to the main frame as possible are better. (the last photo doesn't come trough)
The idea is to distribute the forces over the whole main frame and absorb the forces by the subframe, plus get stiff triangulated conections to the sidecar.
By the way some flexibility is allways left over and the welded motocross s/c rigs in the 70tees never lasted.
Remember the idea of fishing rods and lines. the flexibel rod dampens the hit, but there must be enough stiffness to maintain track and alignments in a highly stressed compound of different frames.
I am not the man to give exact instructions for a subframe, because my lack of experience in this area. But the years of engineering tell me by eye balling:
"Think over your approach again, it doesn't look good nor organic."
Till now You didn't spoil anything except a little material, but spoil the frame of a running bike is expensive and sad.
Including You need a solid spacer for the threads inside the tube for not to collaps them.
For me its enough to have spoiled my 2 stroker engine 3 times, I wouldn't like to experience too much with the frame and toss it in to the scrap too.
That was the reason I did not convert the KLR allthough I just bought her for to become my rig's work horse. But as soon I saw the weak KLR frame naked I got convinced better to go the other way and get a watercooled 4 stroker for the Jawa and keep the KLR as solo. At the end that way will become cheaper.
By the way the tiny Jawa has a strong frame with lots of space and excellent riding position good for long distance riding. In high mountain range as where I live, high speed isn't a good idea, and a small rig is good fun specially at low speeds in the serpentines.
Good luck.
Sven
- 29 Forums
- 11.8 K Topics
- 93.2 K Posts
- 2 Online
- 5,586 Members


