I think the main reason that sidecar makers use heim joints instead of fixed bar ends is because they do provide a bit of "fudge factor" when things don't line up perfectly. I've had rigs with heims that were as wonky as the one in your pic and they seemed to work OK. Obviously, fixed ends will be more rigid than heims. But for now I think you're fine just lining things up as good as you can then making sure that you torque the hell out of those mounting bolts. (I torque mine as tight as I can get them with an ordinary box wrench -- with no cheater bar).
It's also a good idea to tighten the jam nut on the heim bar ends. No need to torque the hell out of them -- the jam nuts just need put tension on the threads.
While working on it use the bolts you have. When it is right swap in New nuts and bolts.

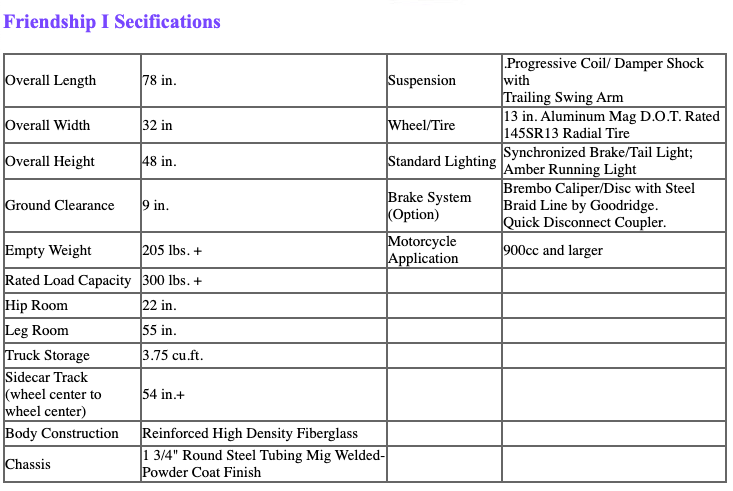
The frame was out of level about 1/2'' side to side and about 2'' difference front to rear, down in the front. The manual says 1'' difference is acceptable.
What should I set the psi in my rear air shock to? I never ride 2 up. I need to find about 200 pounds of weight to sit on the bike,,,lol.
For now focus on getting it setup for what you intend to use it for. If just the dog than that is the only extra weight to focus on now.
If bike has an air shock for now use a bathroom scale to get an close idea of the added weight to the bike and go with that.
You will adjust it more latter for now get it close. Get the wheel off set where it needs to be . Get the height as close as you can.
get toe close. Once this is done step back and look at it. See what needs to be improved.
IMO when mounting the sidecar in last picture I posted. Making the 2x6 jig was worth it. I had to make the mounts for the bike. With bike locked down and sidecar on the boards I was able to move it at will allow me to measure and check positions over and over.
Quote from FlyinMonkeys on November 24, 2022, 11:42 pmCalvin & Hobbs...aka Sidecar Willy....if you plan to keep this Goldwing 1500, I would remove that singular air shock on the rear of the bike, and the singular spring shock on the other side of the rear of the bike, throw them away, and install a matched set of Progressive Suspension rear shocks. They will be a spring shock...and NO air assist at all. One of the failures of that model of Goldwing, was that Mother Honda used an AIR shock on ONE side of the rear suspension, and used a Spring shock on the other side of the rear suspension. It is really noticeable as a 2 wheeled bike, in high speed sweepers, where the rear suspension causes the bike to wallow in high speed curves.
Follow all the instructions that others here are giving you for alignment of the sidecar frame to the bike.....but at some point you are going to want (more than need) to address the inadequate suspension on that bike. A matched set of Progressive Suspension rear shocks, and a heavier set of Front fork springs, with a 10w to 15w fork oil, and the trail reducing triple trees, and the bike will be set up right for sidecar use.
I live too far away from you to be of any hands-on mechanical help, as you live in the state of Misery, and I live in The Great Pacific NorthWET, in the state with the most sidecar owners per capita...Washington.
How many MILES are on that bike now ??? Have you ever replaced the Timing Belts/Cam Belts on that bike's engine ?
It is important, so please don't ignore the question. That is an interference engine, so if one of those rubber timing belts/cam belts break, you just lunched an engine.
I would love to do all the suspension upgrades, and triple trees. But I'm just a broke old fart on a fixed income. Don't really have a lot of cash to play with.
The bike has 69,000 miles on it. I know I need to do the timing belts sooner than later. Have you seen where they upgrade the pulley to a more modern one that will last, and don't get noisy like the honda ones? That's what I want to do when I do it.
Still would like to know how much air I should put in the shock? The air shock was blown when I git the bike. It wasn't bad to ride. So I rebuilt the shock. I've been putting 40psi in it. I think I'll just leave it there unless you guys recommend something different.
Any guesses what just the body weighs. I want to add that weight to the frame while I'm setting up. I'm also going to add 100 pounds like it says to do on the serial number tag if riding solo.
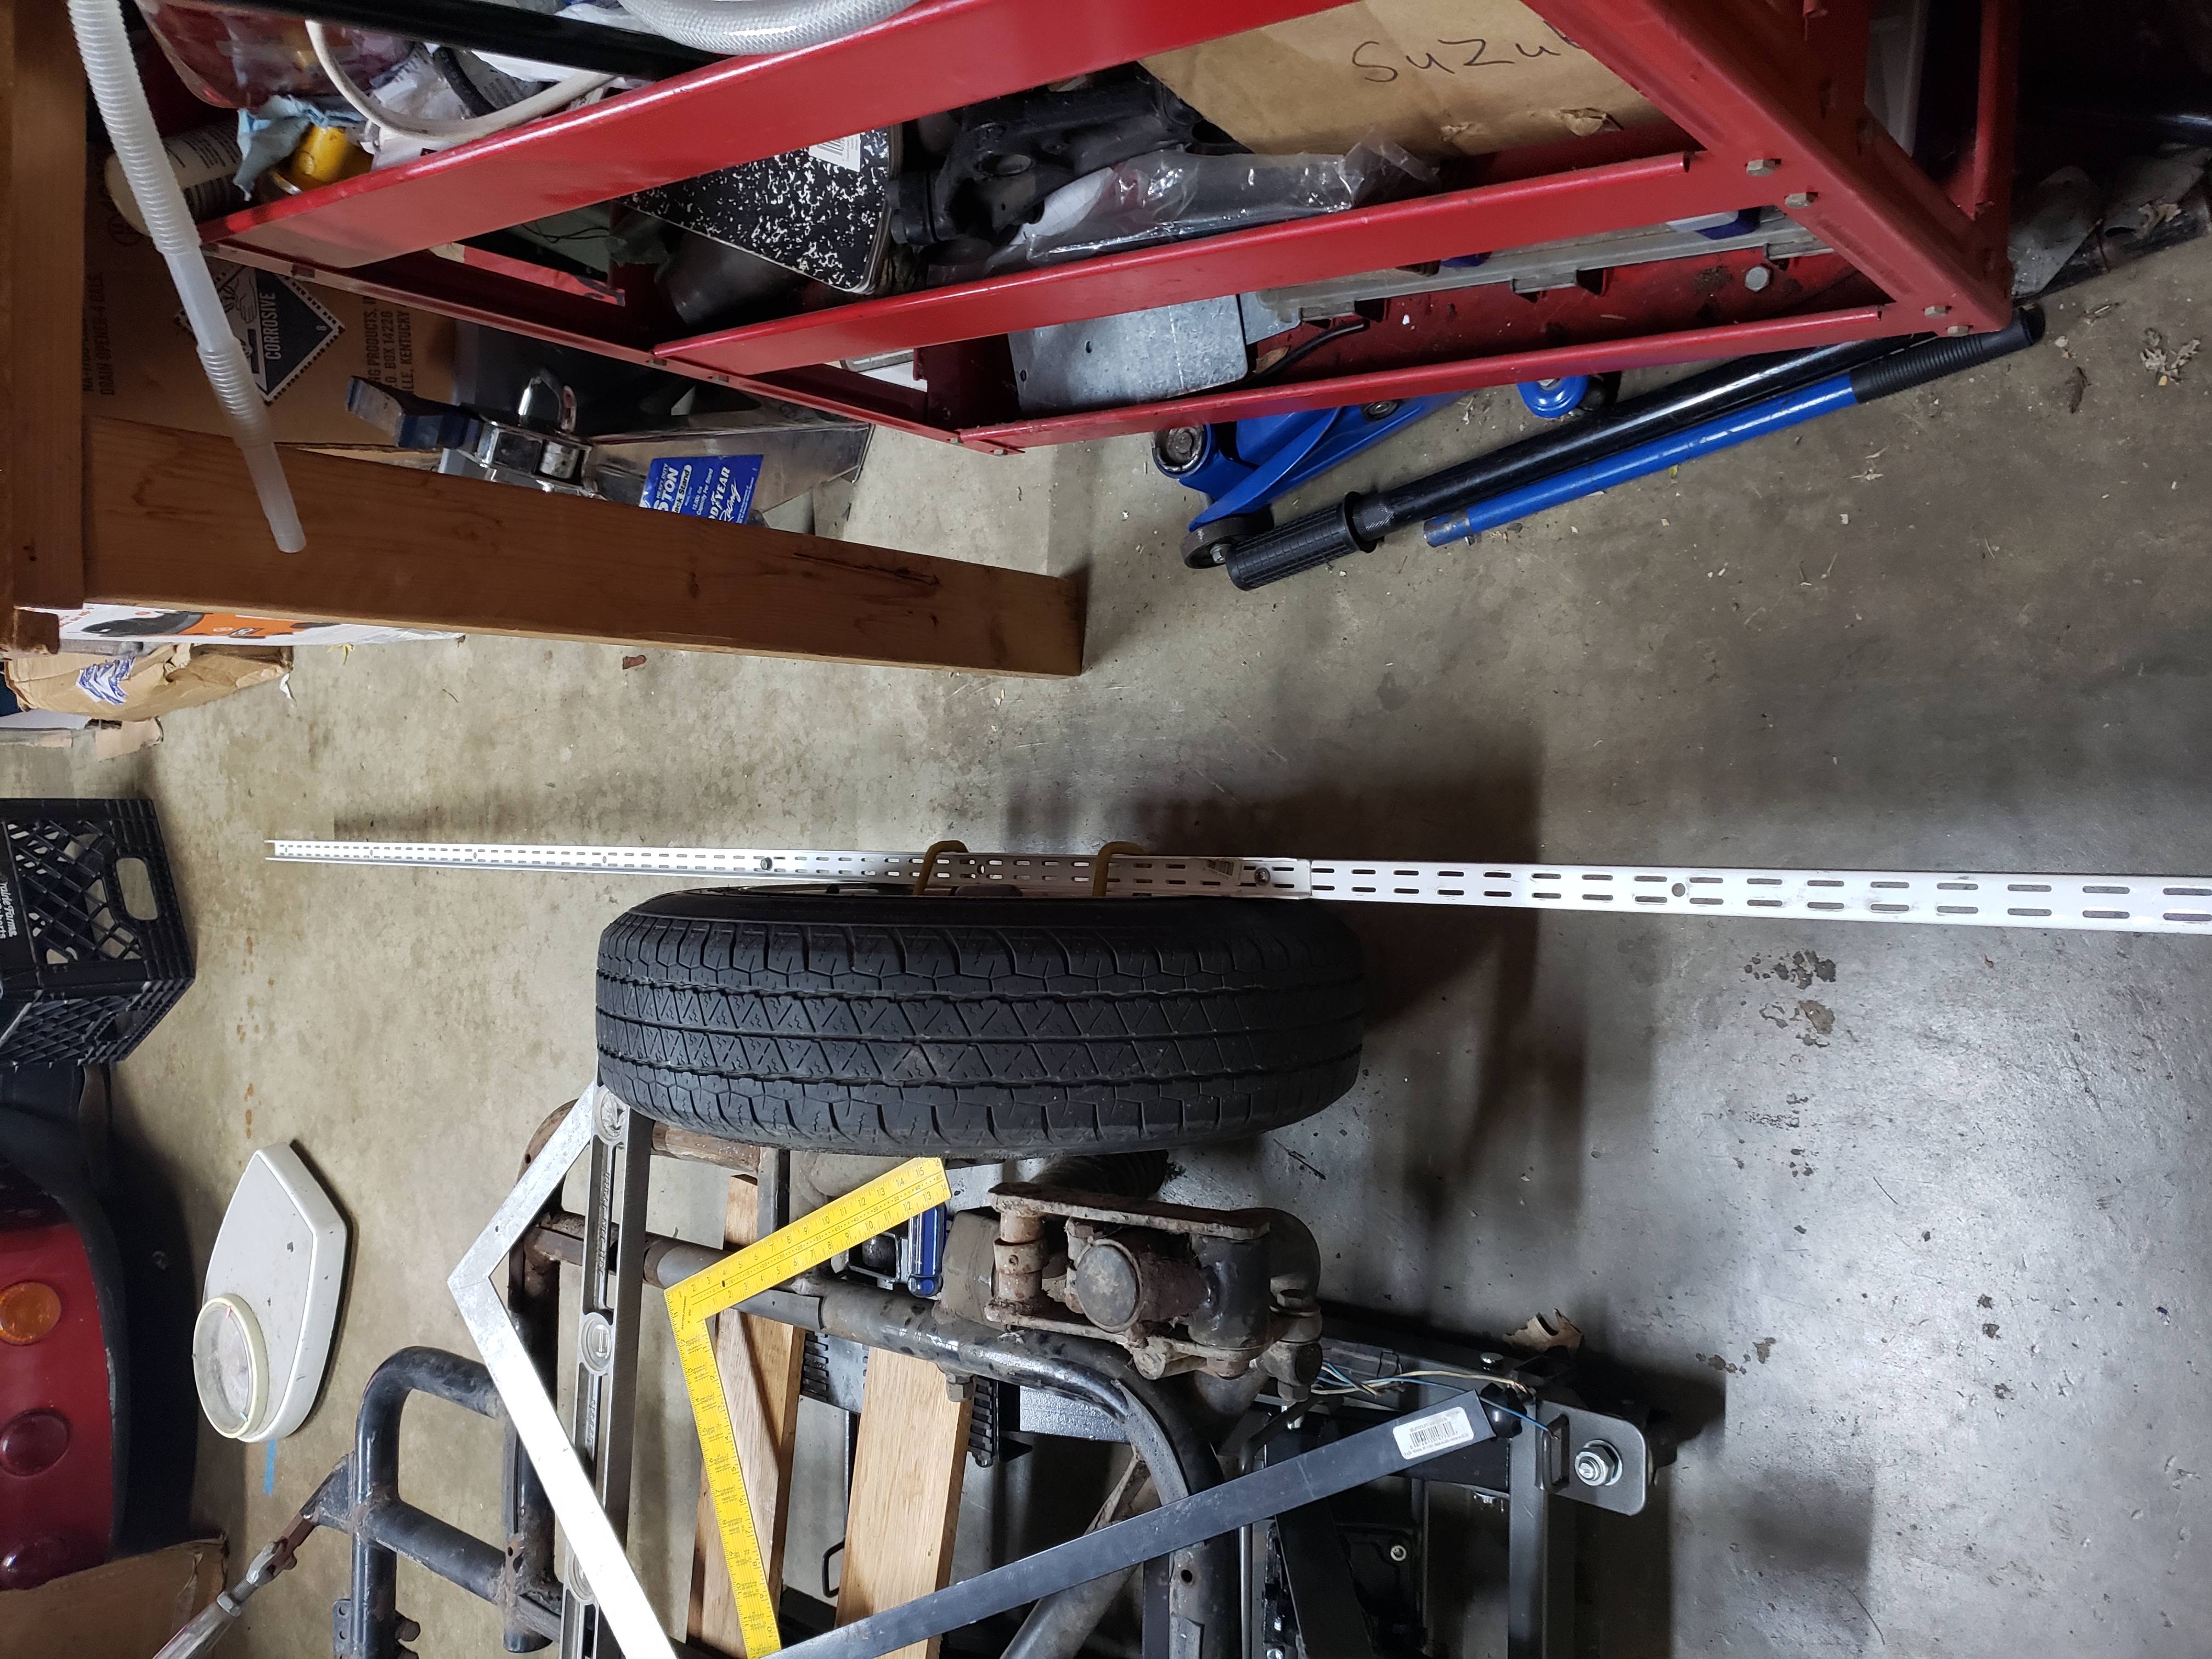
Right now I have 2 shelf bracket rails bolted together that I have bungee corded to the wheel. It's nice and straight.
Can't help you on the air shock question.
Your bungie corded rail is the way I do setups so of course I think that's a great way to do it. Assuming of course you have another one to attach to the rear tire of the bike.
On the weight of the body, I see in your pic you have a bathroom scale there. First weigh yourself. Then take the body and toss it up on one shoulder and hold it there then get back on the scale. The difference is how much the body weighs.
Too bad this forum doesn't have any "rolling on the floor laughing" ROFL emojis. LOL
But seriously, here are the original specs for your car. Based on these, I'd guess the tub alone without the wheel and frame would be around 100 lbs.
Quote from FlyinMonkeys on November 25, 2022, 6:06 pmQuote from Quick_Cal on November 25, 2022, 11:42 amQuote from FlyinMonkeys on November 24, 2022, 11:42 pmCalvin & Hobbs...aka Sidecar Willy....if you plan to keep this Goldwing 1500, I would remove that singular air shock on the rear of the bike, and the singular spring shock on the other side of the rear of the bike, throw them away, and install a matched set of Progressive Suspension rear shocks. They will be a spring shock...and NO air assist at all. One of the failures of that model of Goldwing, was that Mother Honda used an AIR shock on ONE side of the rear suspension, and used a Spring shock on the other side of the rear suspension. It is really noticeable as a 2 wheeled bike, in high speed sweepers, where the rear suspension causes the bike to wallow in high speed curves.
Follow all the instructions that others here are giving you for alignment of the sidecar frame to the bike.....but at some point you are going to want (more than need) to address the inadequate suspension on that bike. A matched set of Progressive Suspension rear shocks, and a heavier set of Front fork springs, with a 10w to 15w fork oil, and the trail reducing triple trees, and the bike will be set up right for sidecar use.
I live too far away from you to be of any hands-on mechanical help, as you live in the state of Misery, and I live in The Great Pacific NorthWET, in the state with the most sidecar owners per capita...Washington.
How many MILES are on that bike now ??? Have you ever replaced the Timing Belts/Cam Belts on that bike's engine ?
It is important, so please don't ignore the question. That is an interference engine, so if one of those rubber timing belts/cam belts break, you just lunched an engine.
I would love to do all the suspension upgrades, and triple trees. But I'm just a broke old fart on a fixed income. Don't really have a lot of cash to play with.
The bike has 69,000 miles on it. I know I need to do the timing belts sooner than later. Have you seen where they upgrade the pulley to a more modern one that will last, and don't get noisy like the honda ones? That's what I want to do when I do it.
Calvin, the LEAST expensive thing you can do, is to assure that the engine on that bike doesn't smash valves into the pistons. Again, that is an interference engine, so if one or both of those rubber timing belts/cam belts breaks, you will have a major top end overhaul that needs to be done.
In my world, the mechanical condition of the motorcycle, or TUG, takes precedence over mounting the sidecar to the Tug, because mechanical things are easier to do on the 2 wheeled bike, than on a sidecar rig....easier to get to both sides of the bikes, etc....and "IF" for some reason you discover that the bike/Tug has a major mechanical issue that deems it not worth fixing, then adding the sidecar first is just a waste of time.
Bottom line, and then I leave you to your own devices....for an HOUR of time, and less than $ 50.00 (low end) or up to a max of $ 100.00 (high end) you can make sure that engine doesn't get ruined. In most cases, the tensioner pulley doesn't need to be replaced when doing timing belts/cam belts. If that tensioner pulley is already making noise, screeching at you, then by all means replace it.
But understand...it is not just the 69k miles on those belts....it is also 30+ years of time, age, cold and heat...it is the YEARS that cause more wear and tear on those rubber belts, than just the 69k miles.
Unless you can verify through paperwork that at some point in the past 10 years that those rubber belts have been replaced....personally I would not even start the engine without replacing them. Yeah, I know, you have already driven it around, and it hasn't blown up...YET ! There is the key to the entire thing....YET ! For less than $ 100.00 (max) and one hour of time, you could have some peace of mind knowing the engine will not blow up.
Just wondering if you are on any of the Goldwing forums?
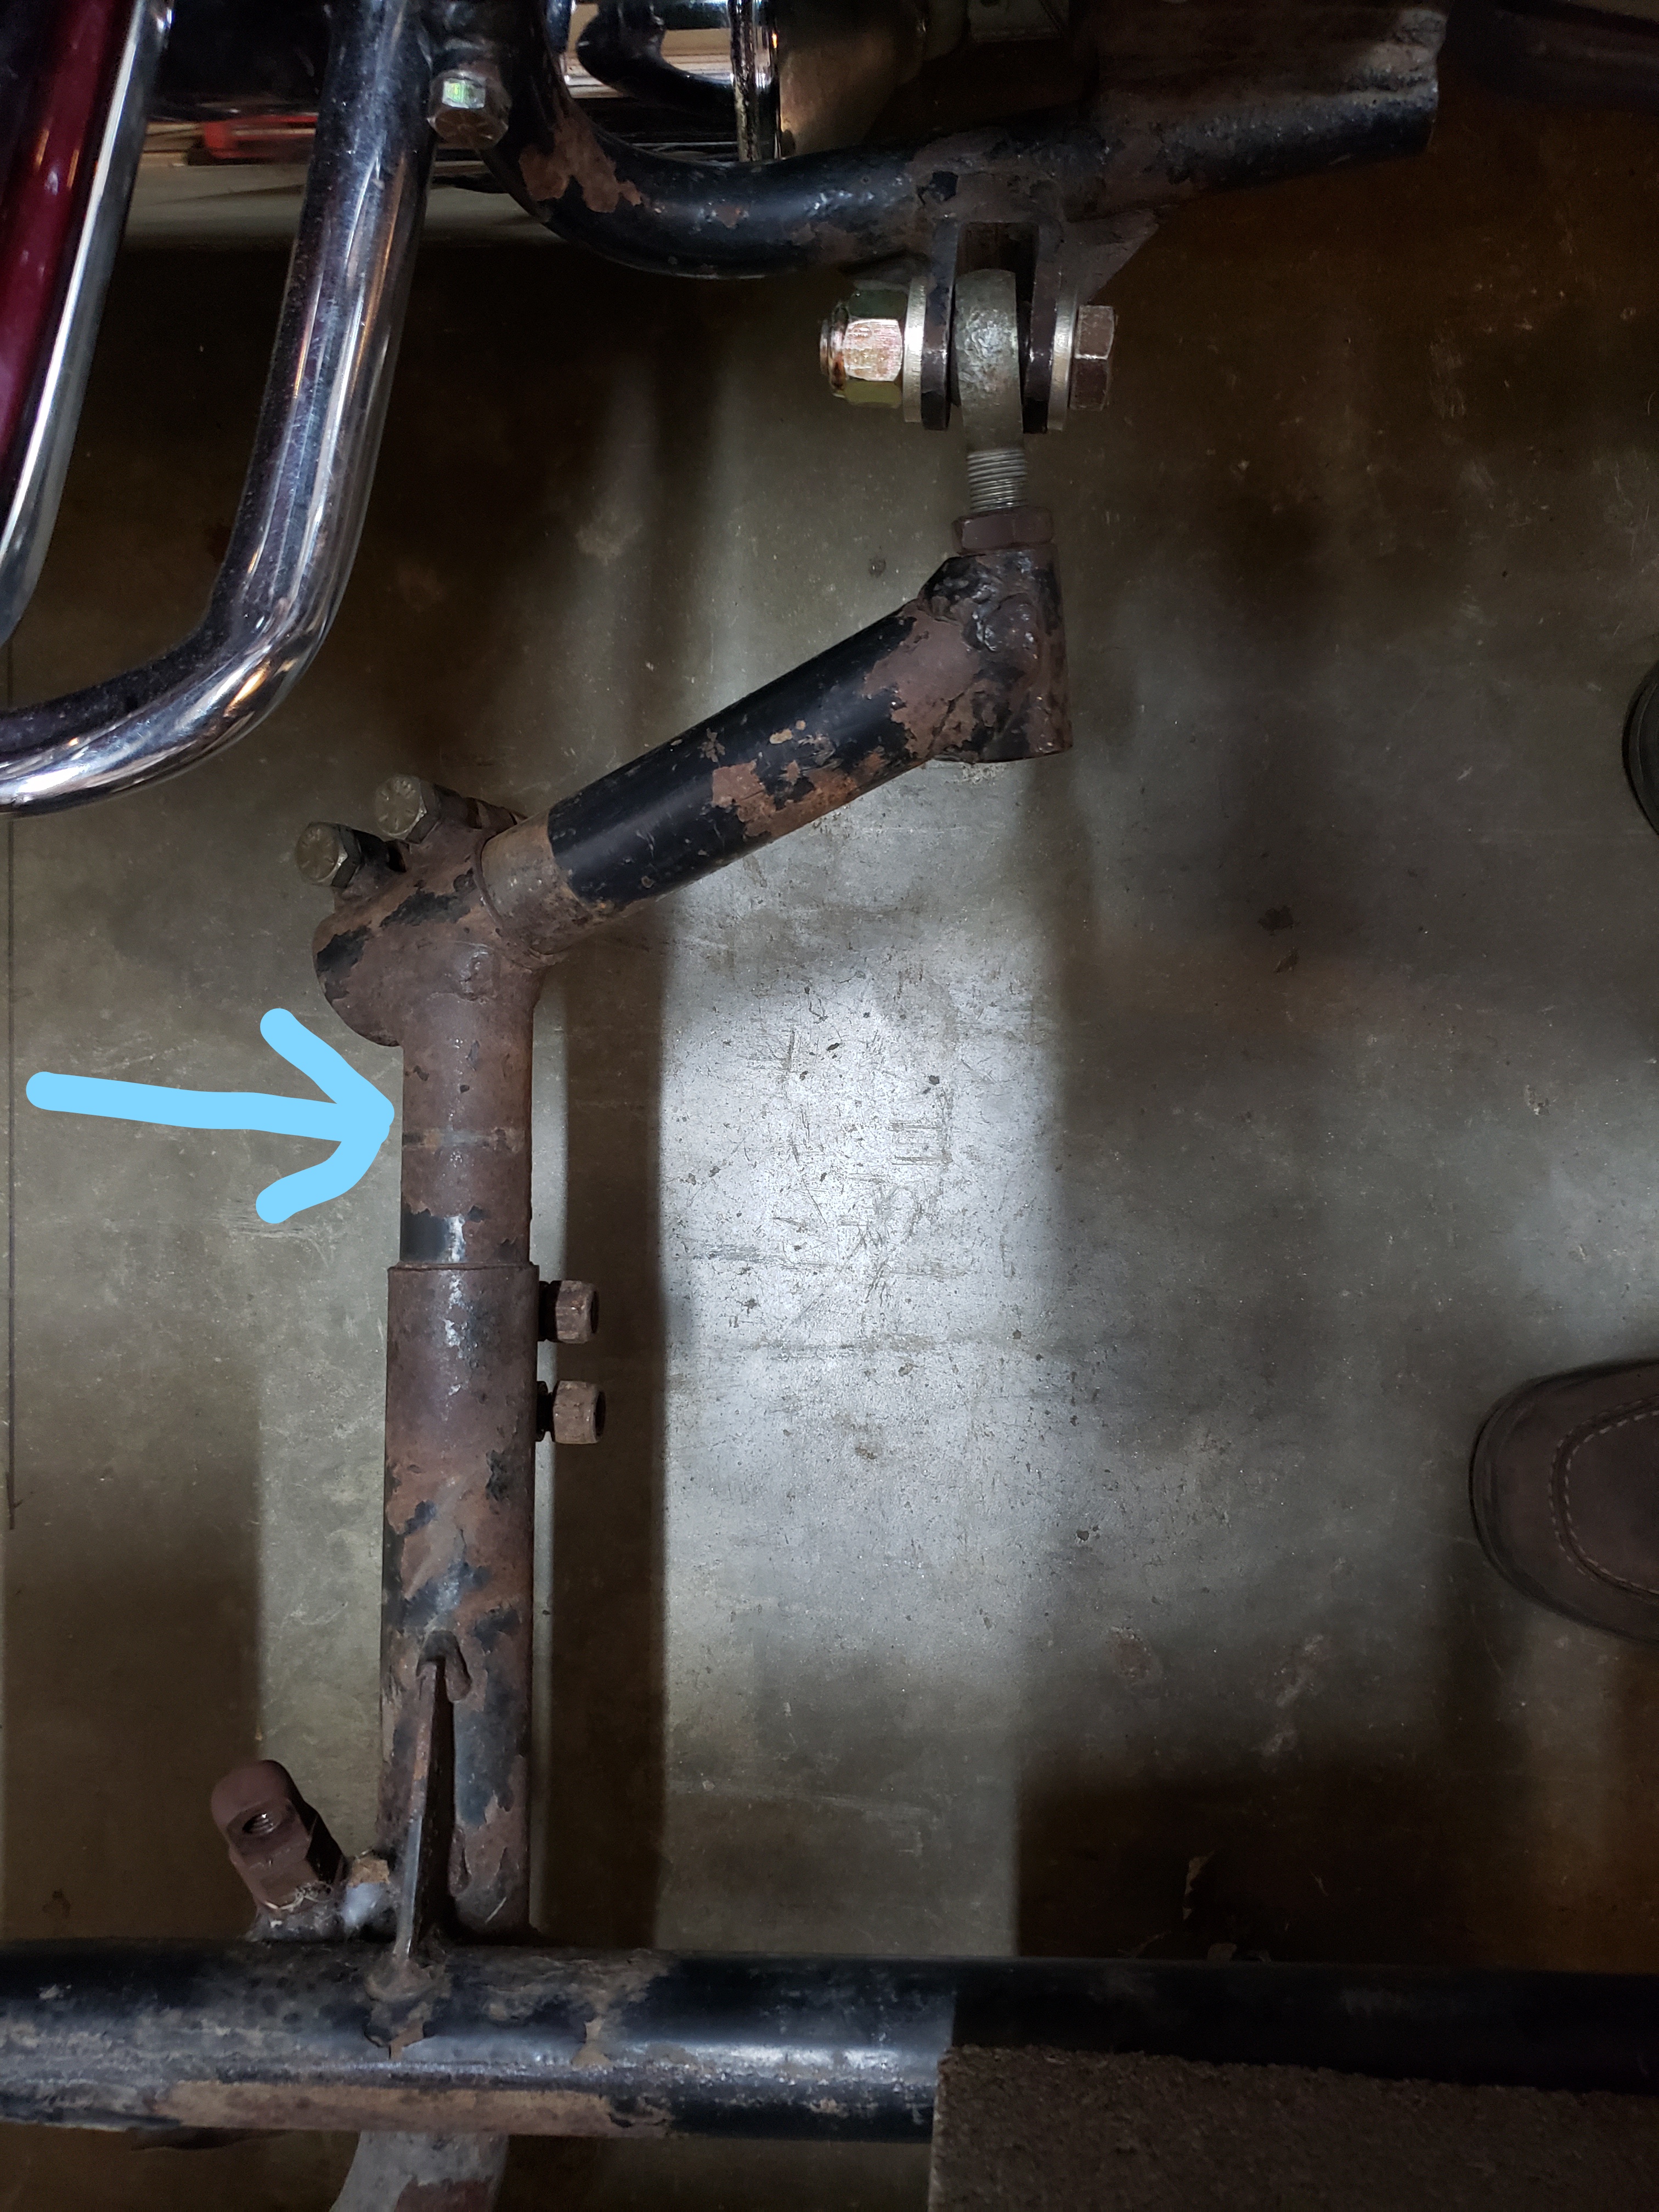
This rear bracket is kicking my butt. Because the tabs are angled back so far where the lower bolt goes through, it is making it difficult to get my toe in set correctly. I've got it set to 3/4''. The instructions call for 1''- 1-1/4''. It's easier if I pull the front way out away from the bike then install the rear heim joint. Then move the front back in towards the bike to bolt up and set toe in. The problem is if I push too far in I can see the rear bracket start to flex and I have to push pretty hard. Seems like this is binding things up and putting stress on things. Just doesn't seem right to me. But I could be wrong. Is this just what it takes?
This may or may not be an issue. It says I'm supposed to have 58+ inches track width. I can only get 57'' due to the rear 70* angle clamp being rusted in place. I tried turning it with a pipe wrench and it won't budge. I've read not to lube these or they will slip. But if you guys think I need to hit that 58'' I'll just have to use some pb blaster on it and try to free it up. Or should I just leave it?
I'm thinking I should try it with the toe the way it is and see how it does. If it needs more toe in then I need to figure something else.
Please advise. Thanks

That dogleg is frozen? Well, then, yes, definitely hit it with PB Blaster. The advice "not to lube" the clamp joints in your brackets is of course 100% correct, but out of context. The correct advice is don't lube them during or after assembly.
You need to be able to adjust that dogleg. Maybe give the PBB a day to penetrate. Disassemble the dogleg, sand out all the rust, then use some rust converter liquid on the metal pores to really get the rust out. Then sand rough/smooth (150 grit) before degreasing and reassembly.
Once you've done that it should be pretty easy to get that heim joint aligned.
You might also want to start thinking about a rattle can for those parts. I like matte black wheel paint or caliper paint because it's tough and easy to touch up. You really don't want your subframe, struts or mounts getting rusty.
Quote from DRONE on November 26, 2022, 3:08 pmThat dogleg is frozen? Well, then, yes, definitely hit it with PB Blaster. The advice "not to lube" the clamp joints in your brackets is of course 100% correct, but out of context. The correct advice is don't lube them during or after assembly.
You need to be able to adjust that dogleg. Maybe give the PBB a day to penetrate. Disassemble the dogleg, sand out all the rust, then use some rust converter liquid on the metal pores to really get the rust out. Then sand rough/smooth (150 grit) before degreasing and reassembly.
Once you've done that it should be pretty easy to get that heim joint aligned.
You might also want to start thinking about a rattle can for those parts. I like matte black wheel paint or caliper paint because it's tough and easy to touch up. You really don't want your subframe, struts or mounts getting rusty.
The one that is frozen is the one going into the sidecar frame. Not the one that attaches to the bike.
I'm trying to get my chemo brain to think of if rotating the one going into the sidecar will it change the angle? I think it will change the lead and height of the frame?
All the other mounting points point straight out. This is the only one that is at an angle. I sure would like to see another mount angled like this,,,lol. Won't it still point straight in?

Quote from DRONE on November 26, 2022, 3:08 pm
You might also want to start thinking about a rattle can for those parts. I like matte black wheel paint or caliper paint because it's tough and easy to touch up. You really don't want your subframe, struts or mounts getting rusty.
Ya. The whole frame needs some attention. I was going to wire brush the rust off and use rust converter on it. The spray paint. But I can't do that in my garage and now it's too cold outside. So that part will have to wait. Actually. When I took the body off and tipped the frame up water came running out of it,,,,lol. Also, when I took a strut apart there was A LOT of water in it.
Half of the rubber stripping between the body and frame is missing. I'm not sure exactly what to use. Florida sidecar sells some but they want $40. Seems like it could be had cheaper. What are you guys using?
I get what you mean about the chemo brain but you don't need to be able to imagine it. You can simply DO it!
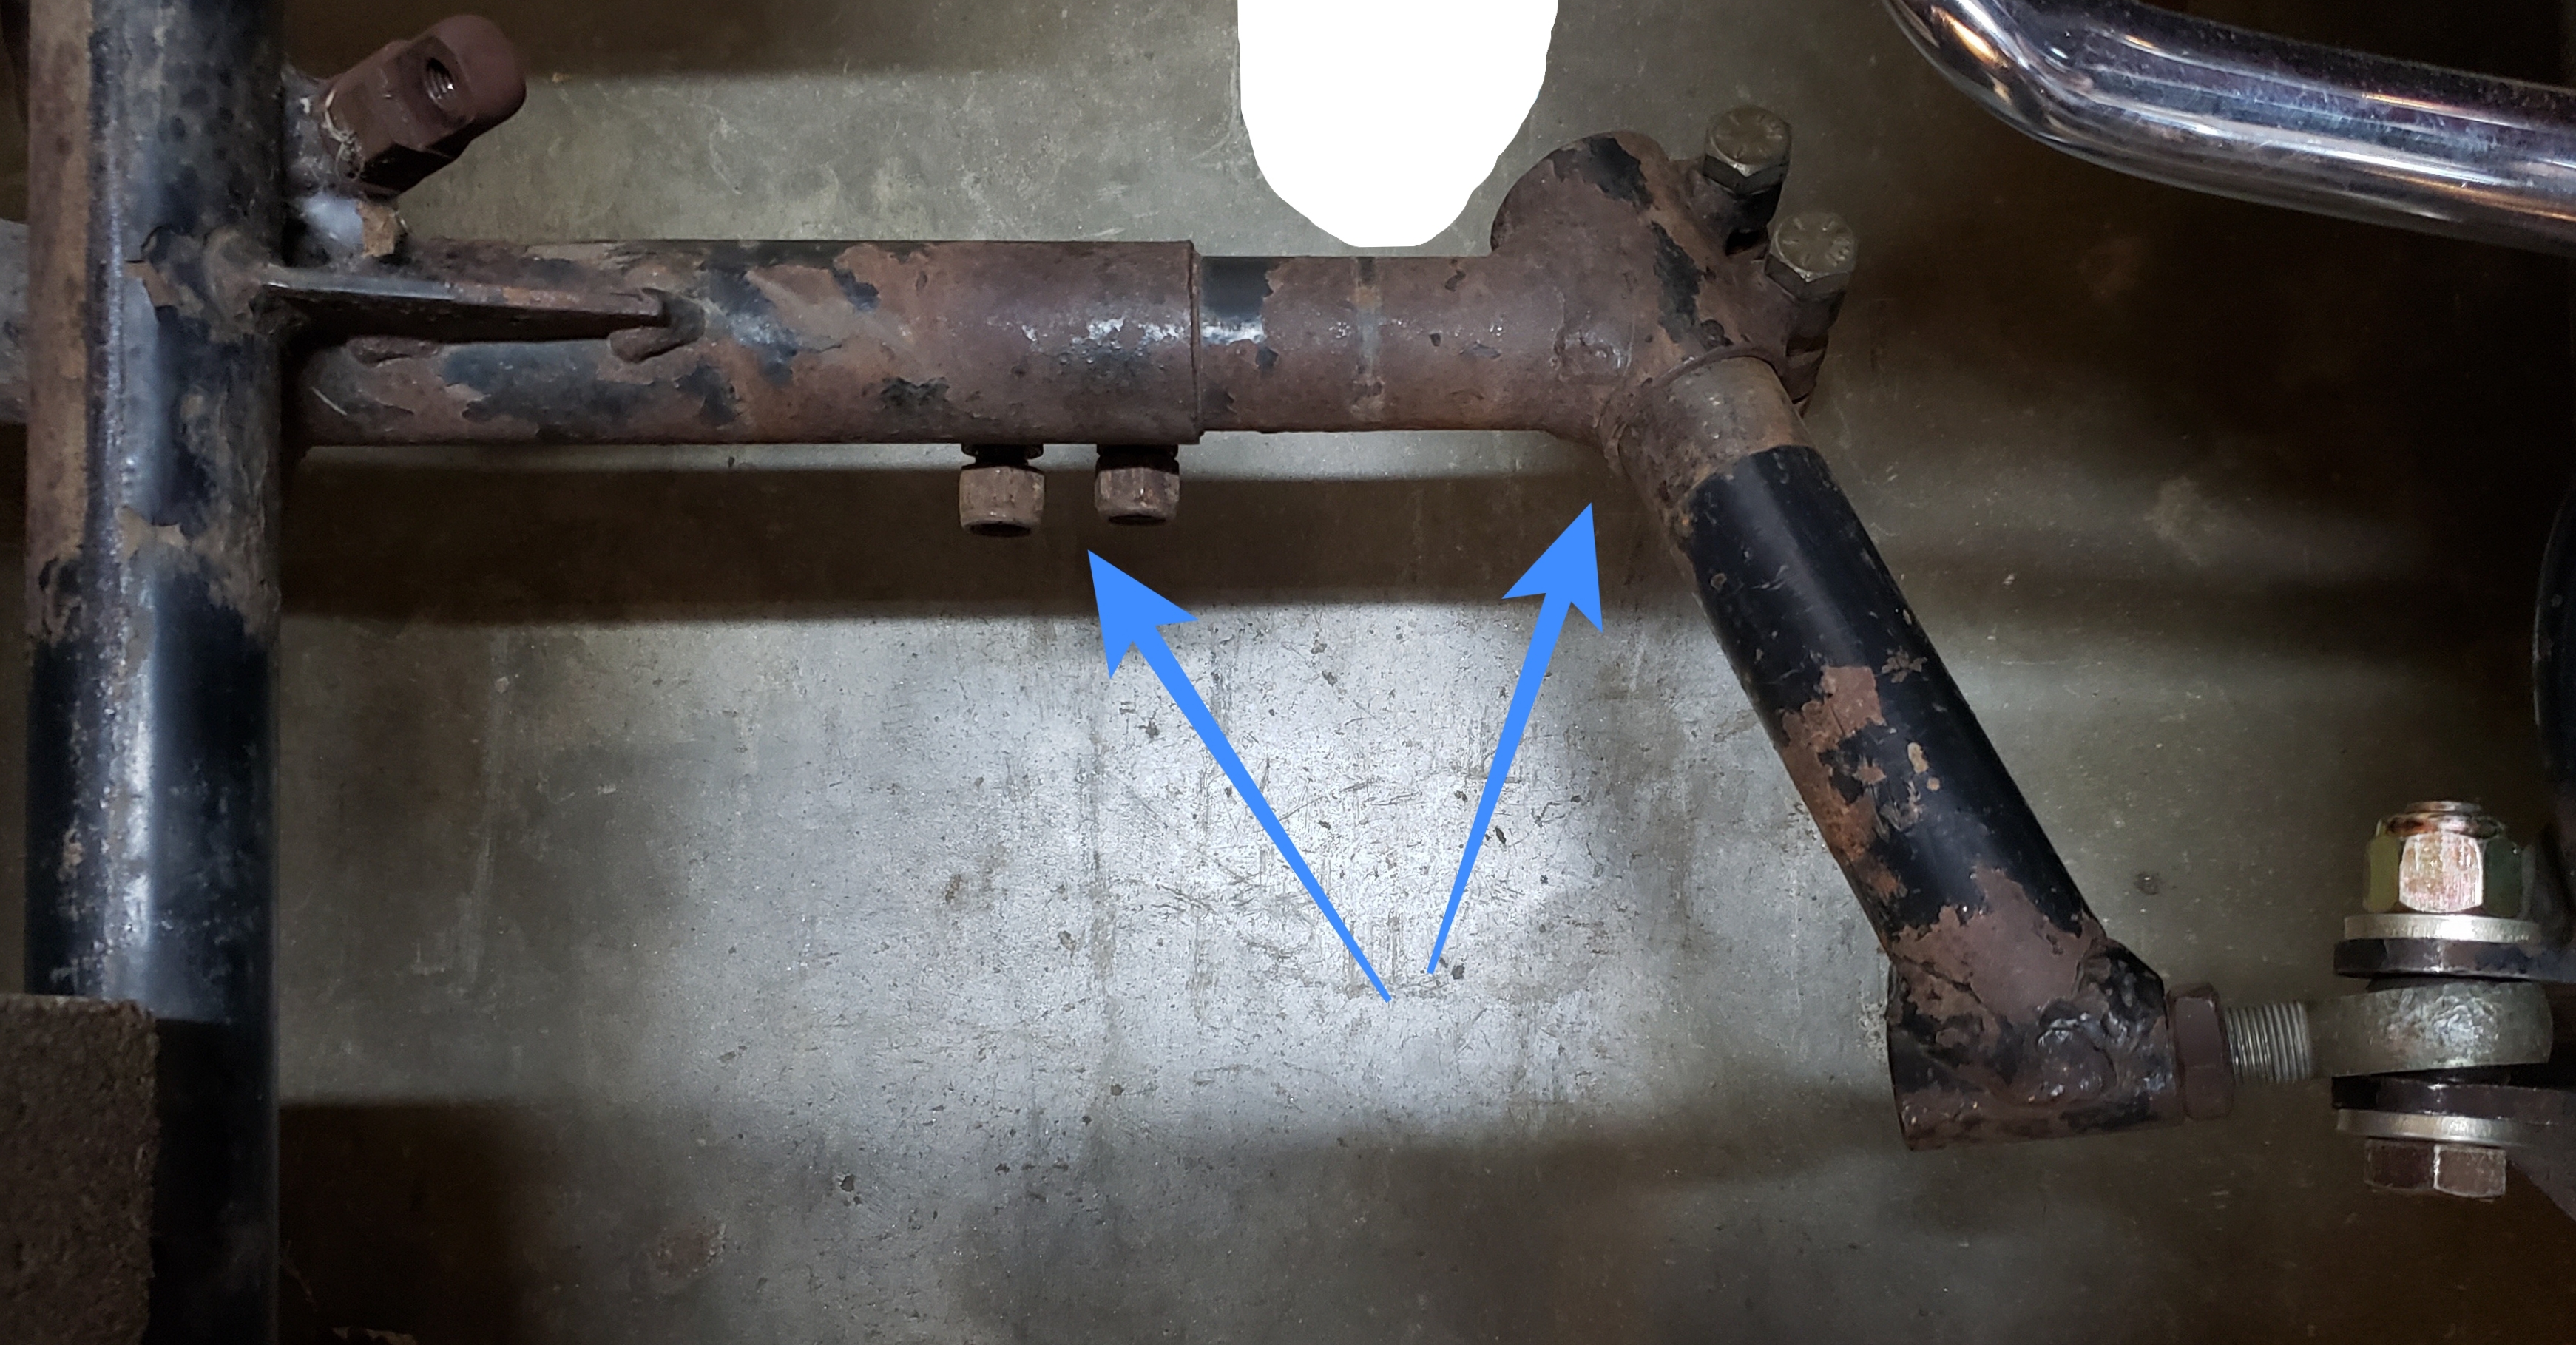
The dogleg has TWO joints in it -- see my pic attached. Disassemble and clean up BOTH of those tube clamp joints. Then use a floor jack to prop up the sidecar approximately where you want it, then put the dogleg back on but assembled nice and loose so that the tubes can slide easy in and out of those clamps. When you get to that point, wiggle and waggle the loose dogleg parts until you have the heim lined up where you want it. You might need for the front lower mount to also be loose while doing this. Once the heim is lined up then tighten the two clamps. And the front mount. Now remove the floor jack.
All the clamps should be pretty close at that point. Measure your toe-in and use the clamps closest to the sidecar to adjust your toe-in. (I prefer to make my front mount as short as possible but I don't know if that's what most do or not.) Use the upper struts of course to adjust your lean out.
Quote from DRONE on November 26, 2022, 5:10 pmI get what you mean about the chemo brain but you don't need to be able to imagine it. You can simply DO it!
The dogleg has TWO joints in it -- see my pic attached. Disassemble and clean up BOTH of those tube clamp joints. Then use a floor jack to prop up the sidecar approximately where you want it, then put the dogleg back on but assembled nice and loose so that the tubes can slide easy in and out of those clamps. When you get to that point, wiggle and waggle the loose dogleg parts until you have the heim lined up where you want it. You might need for the front lower mount to also be loose while doing this. Once the heim is lined up then tighten the two clamps. And the front clamp. Now remove the floor jack.
All the clamps should be pretty close at that point. Measure your toe-in and use the clamps closest to the sidecar to adjust your toe-in. (I prefer to make my front mount as short as possible but I don't know if that's what most door not.) Use the upper struts of course to adjust your lean out.
Sounds like the old Nike commercial. Just do it,,,lol.
In my last pic it shows that rear heim joint adjusted way out. I didn't like doing that at all. But I had to to get to 57'' out of the recommended 58''. Of course if I can get that joint loose I should be able to move it out.
I might have to take everything loose again so I can turn the frame side ways. Then I can put a board on the end of the clam and get a good hit on it. But I'll try a pipe wrench first.
Should I maybe try some heat on it too?
