
Quote from AceinSav on November 20, 2022, 2:41 pmJust FYI you can get a single rocker switch that is dual I have mine wired that way
I think you might have misunderstood me, or I'm misunderstanding you,,,lol.
I meant one switch to work the up and down on the actuator, and one switch for something else. But I don't think I'll be able to get 2 rocker switches in there anyway.
Quote from DRONE on November 20, 2022, 3:01 pmIf you go with a rocker switch, you'll need to source a weather-resistant one with a 30-amp rating that won't be too bulky. Hard to find. The 30-amp toggle that most guys use, on the other hand, are common and cheap. And, yes, unattractive.
I installed a nice-looking polished aluminum switch from Pingel (see pic below) on my GS rig (link -- www.amazon.com/gp/product/B000OO2QP4/ ). Because it had a low amp rating I had to run the actuator leads through two relays using a fairly complicated wiring scheme (schematic attached below). Since you said in Post #1 that you're electrically challenged, I wouldn't suggest it. Anybody else reading this thread, if you click on that Amazon link you'll see my review where I go into some specifics about the Pingel. It did work really great once I got it sorted, and looked great on the bars, too. There are other 7/8" bar switches on Amazon that might work better though.
With a 30-amp switch no relays are needed. Simple wiring diagrams can be found using Google Images. You can try using a 20-amp switch but I wouldn't recommend it because most actuators used on sidecars will actually pull 20 amps and that'll make your switch the weakest part of your actuator circuit.
Would this switch work?
I don't think I could get 2 in the box vertically. But I could put one in there horizontally. Which would be fine. I just wanted 2 switched because the box looked like it needed 2,,,lol.
https://www.etrailer.com/Accessories-and-Parts/JR-Products/37213845.html
Make sure any switch you use is not an on off type. You want it to stop soon as you release it.
Same type switch you use on ATV to run winch .
Quote from Quick_Cal on November 20, 2022, 4:54 pm
Would this switch work?
I don't think I could get 2 in the box vertically. But I could put one in there horizontally. Which would be fine. I just wanted 2 switched because the box looked like it needed 2,,,lol.
https://www.etrailer.com/Accessories-and-Parts/JR-Products/37213845.html
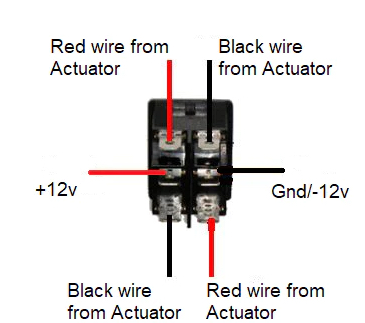
I think you got a winner there with the DPDT switch! It says on the side that it's rated 30A for 12V. The other one, the SPDT is a no go. Attached is a wiring diagram for the switch. Note, though, that the eTrailer DPDT switch already has the two "up" terminals connected to each other, and ditto for the two "down" terminals, so you just need to run 4 wires to the switch (not 6). The four wires are (1) "+" from your power source, (2) ground, (3) actuator wire, and (4) the other actuator wire.
Do be sure to have a 30A fuse between the switch and the power source. And since the distance from the actuator to the switch is pretty long I'd think that 16 gauge marine-grade tinned copper wire would be the smallest allowable size to use. 14 gauge would be better. You'll see online recommendations to use 12 gauge or even 10 gauge but that's ridiculous IMO. 14 is plenty as long as you stick with good wire, not junk.
Quote from DRONE on November 20, 2022, 6:02 pmQuote from Quick_Cal on November 20, 2022, 4:54 pmWould this switch work?
I don't think I could get 2 in the box vertically. But I could put one in there horizontally. Which would be fine. I just wanted 2 switched because the box looked like it needed 2,,,lol.
https://www.etrailer.com/Accessories-and-Parts/JR-Products/37213845.html
I think you got a winner there with the DPDT switch! It says on the side that it's rated 30A for 12V. The other one, the SPDT is a no go. Attached is a wiring diagram for the switch. Note, though, that the eTrailer DPDT switch already has the two "up" terminals connected to each other, and ditto for the two "down" terminals, so you just need to run 4 wires to the switch (not 6). The four wires are (1) "+" from your power source, (2) ground, (3) actuator wire, and (4) the other actuator wire.
Do be sure to have a 30A fuse between the switch and the power source.
All righty then. By looking at the etrailer switch I thought it was the same as the one in this video except has the jumpers built in. Thanks for the help.
Here's a video for the electronically challenged,,, like me. And it's working an actuator. How much easier could it get.
We use a motor reversing switch. It is essentially a DPTP monetary contact switch that has jumpers built onto the switch.
Two wires to the battery, two to the actuator. In stock $25
Jay G
DMC sidecars
866-638-1793
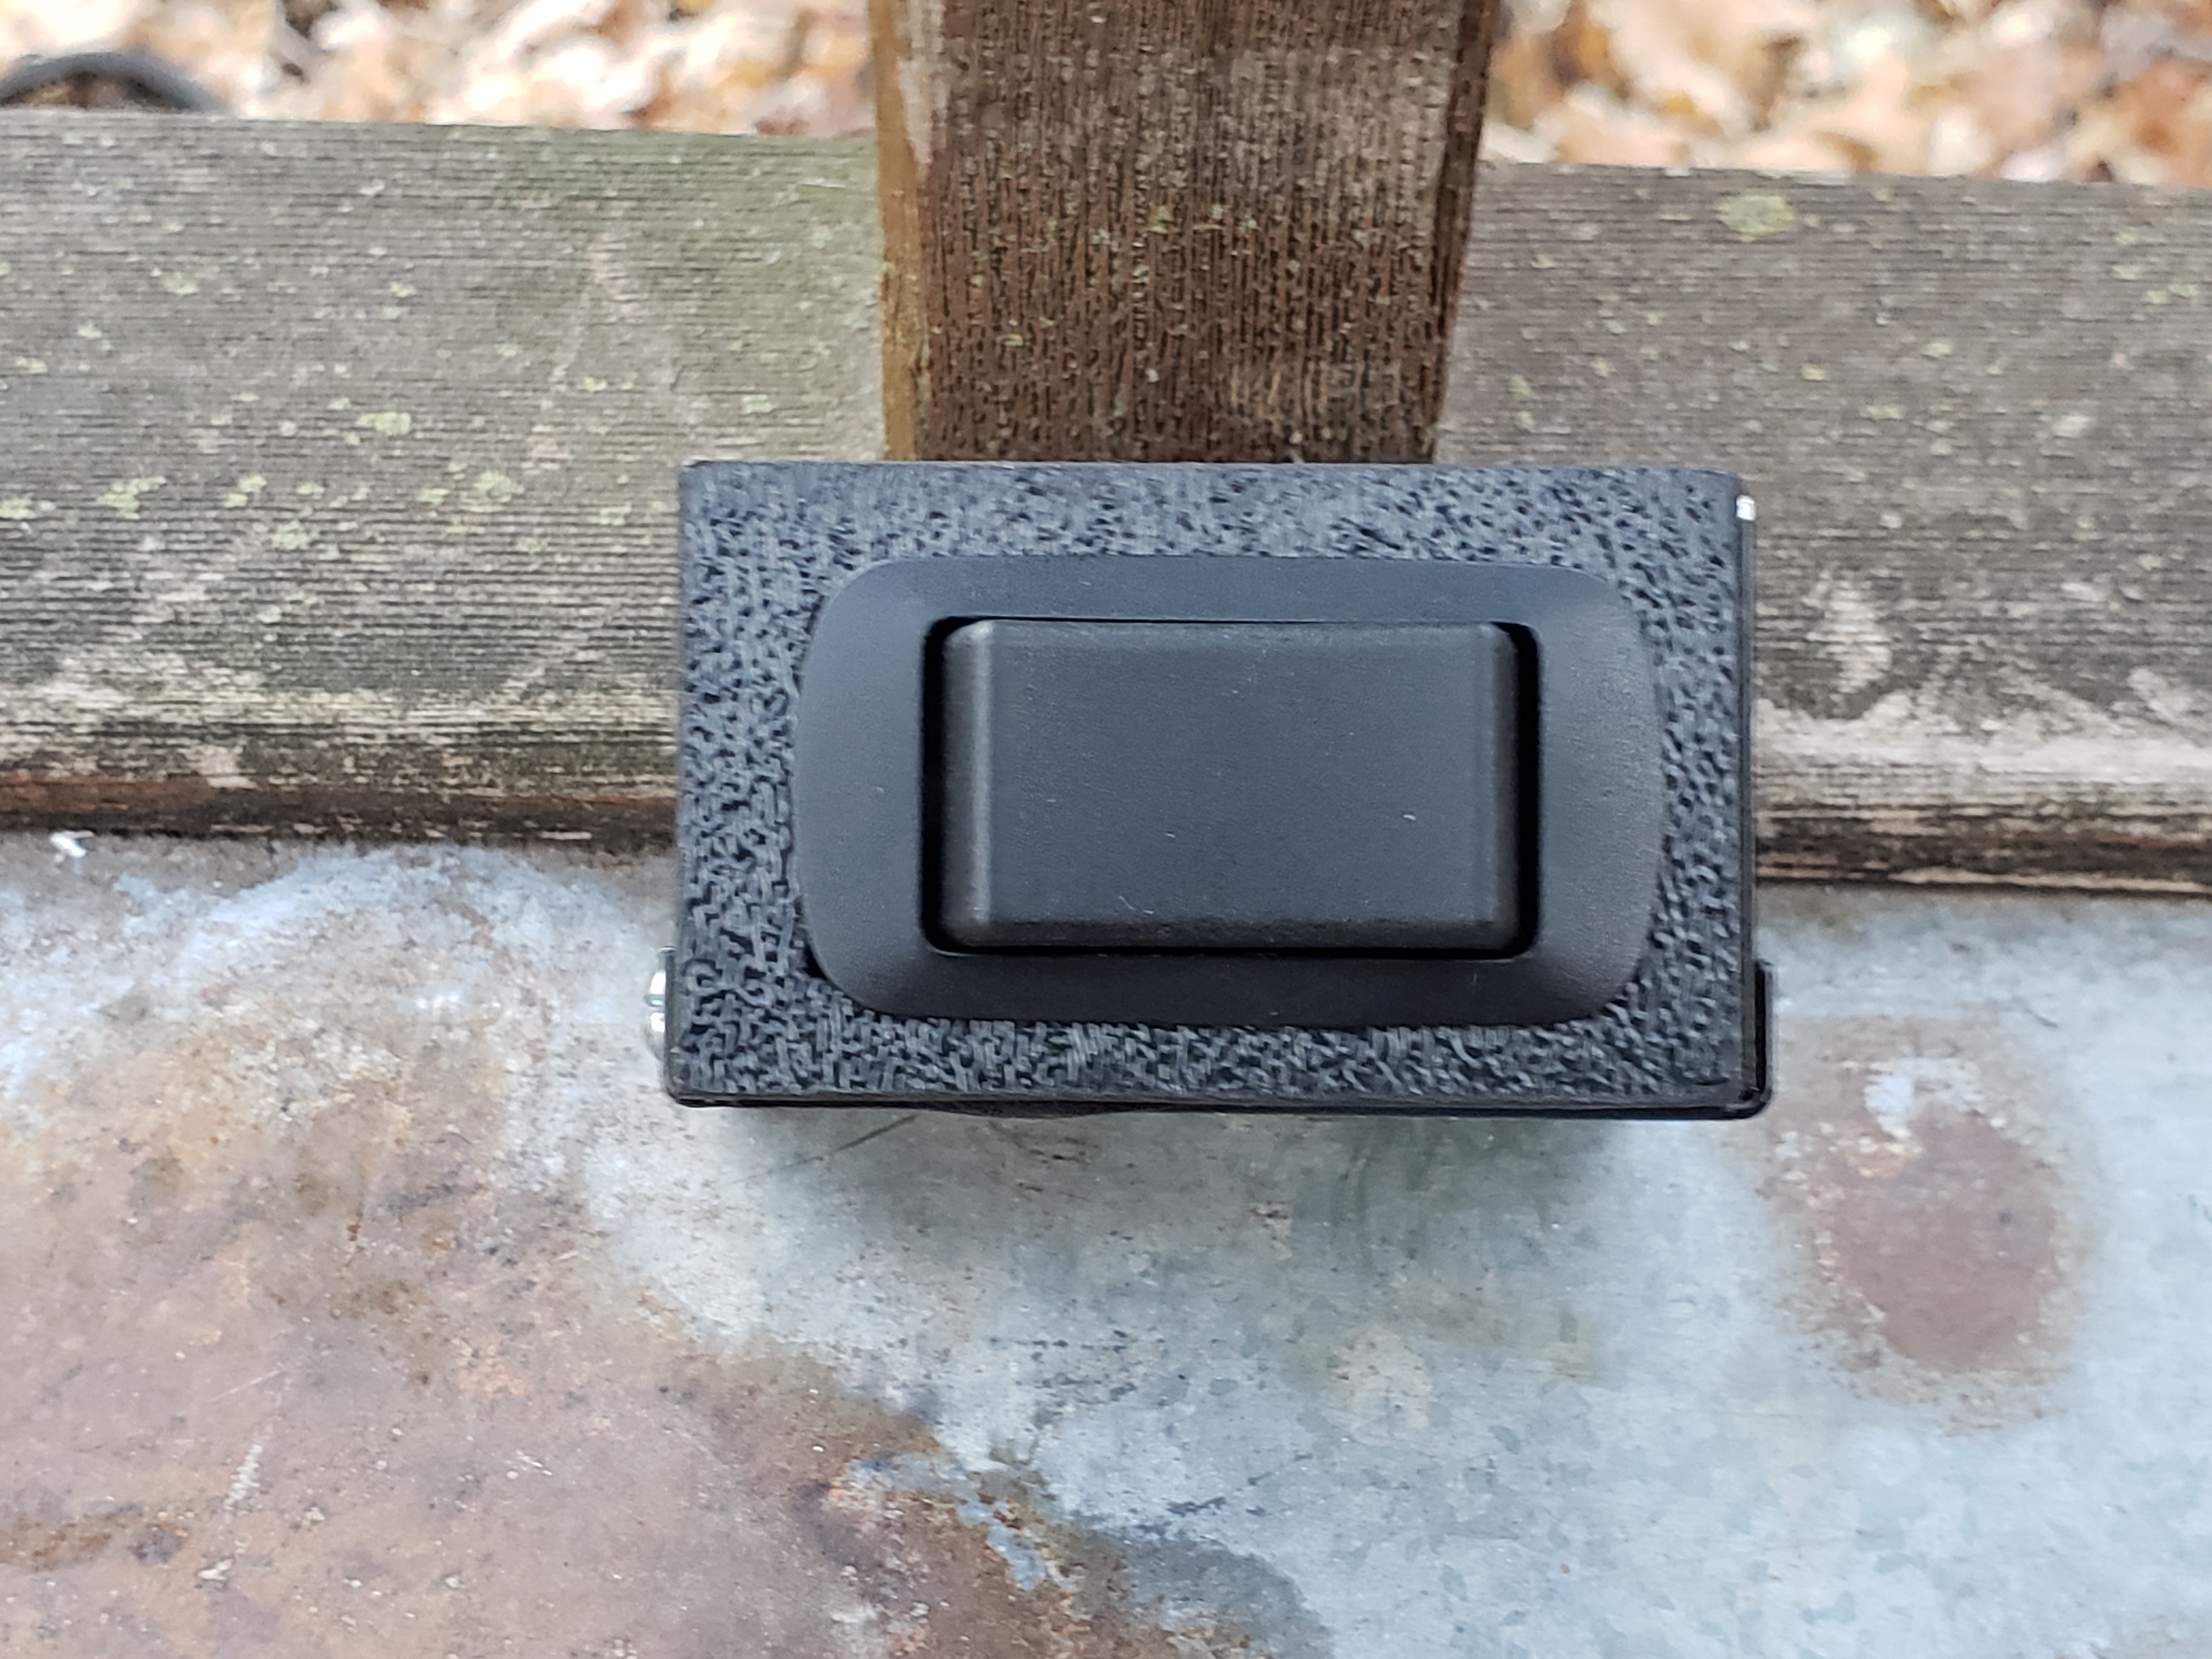
I got my switch box cut out for the rocker switch. The tabs on the switch were too long and I had to cut them off. I'll just solder the wires on. I also made a face plate for it. Now I just need to mount it under the turn signal housing and wire it up.
Correct me if I'm wrong. But I THINK the way I want it to work is if the rig is pulling to the right I want to extend the actuator which makes the bike lean to the left and track straight? Correct? So I want to push the left side of the switch? Seems logical push the switch the direction you want to go,,,lol.
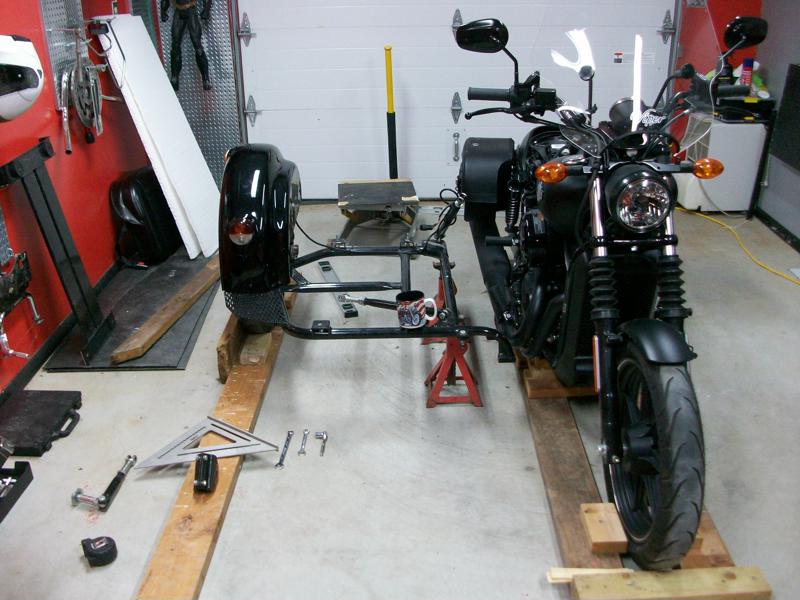
I actually got the car mounted to the bike today. I even rode it around the block. It's way out of alignment. I was hoping since it came off a Goldwing it would go right on. I have one bracket that's way off. I may just take it all apart and start over.
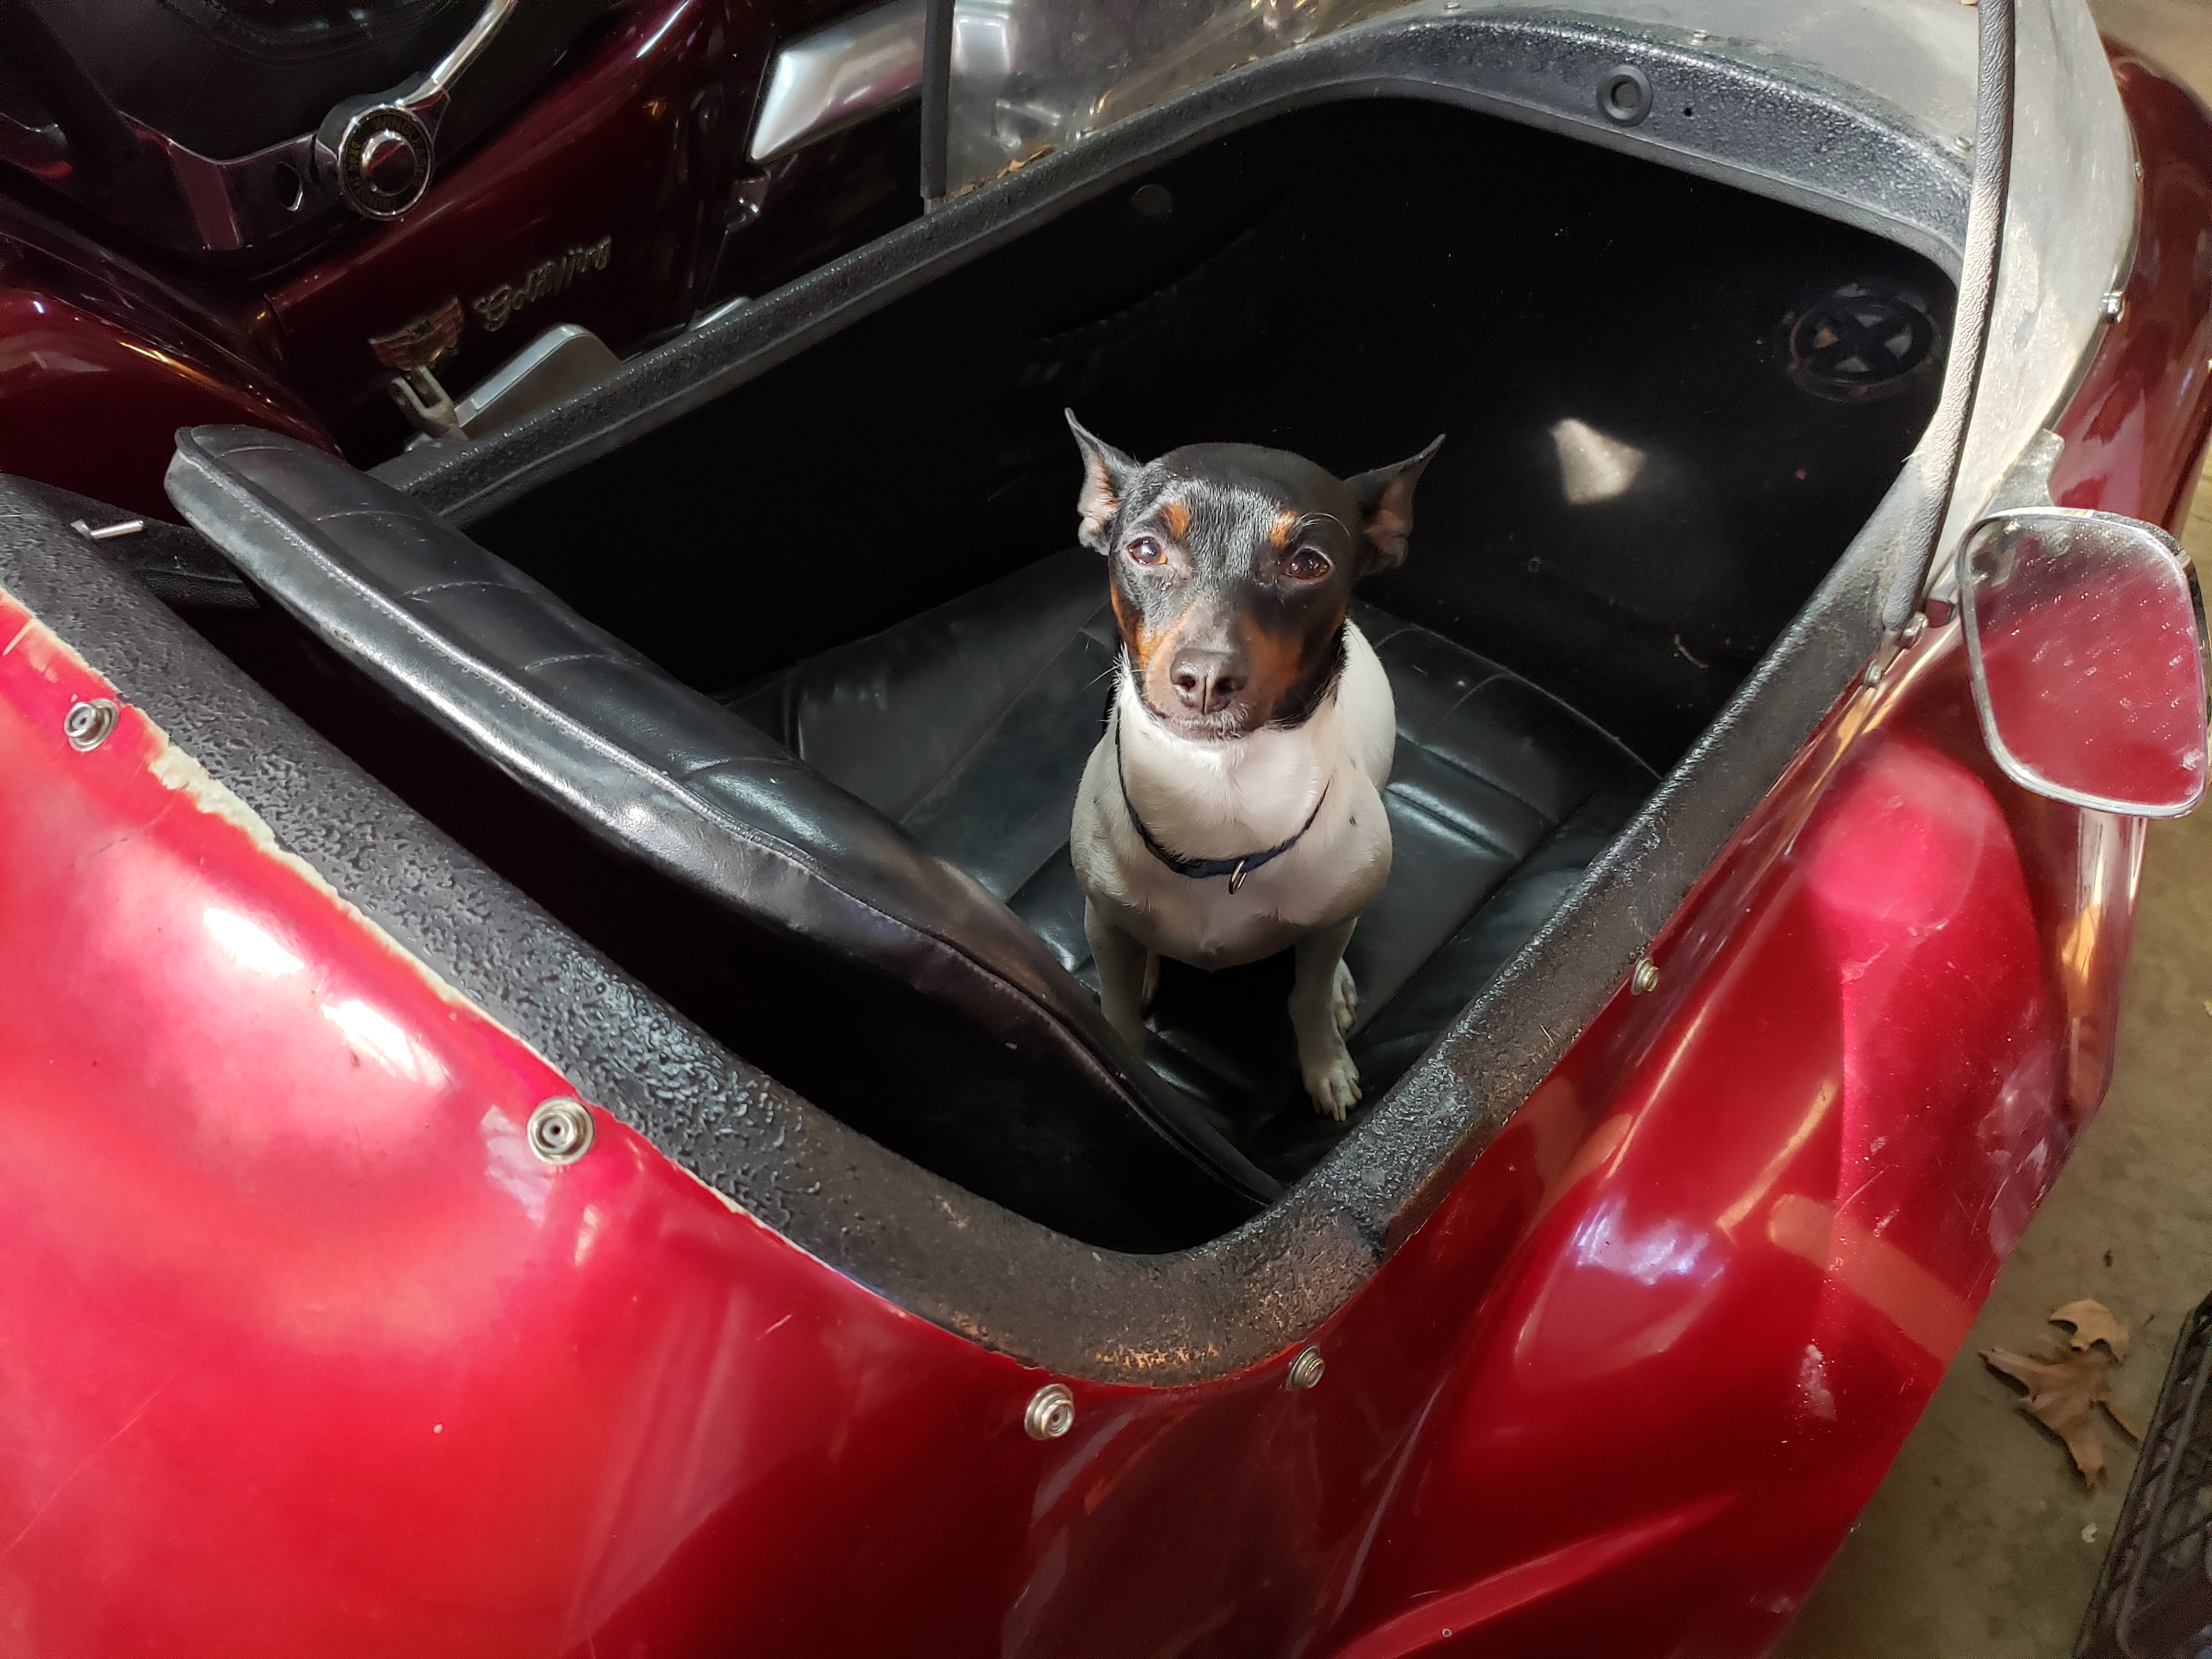
Oh ya. I did take my dog for a ride around my front yard. He had a blast. His tail was wagging like crazy the whole time. That right there made it all worth while even if I never ride it again.
Here's a short video if you care to watch. My stuff is not the prettiest. But good enough for me and my dog,,,lol.

Quote from Quick_Cal on November 23, 2022, 8:52 pmCorrect me if I'm wrong. But I THINK the way I want it to work is if the rig is pulling to the right I want to extend the actuator which makes the bike lean to the left and track straight? Correct? So I want to push the left side of the switch? Seems logical push the switch the direction you want to go,,,lol.
Correctamundo!
Nice job on mounting that switch in the box. And your dog looks like a natural, though I think the paint on the sidecar is gonna take a beating from those front claws!
Once you get the struts to your liking, and do the setup, you still might find that the rig steers like a school bus with no power steering. Most of us with Goldwing hacks have a front end modification to lighten the steering effort. Not trying to rush things, just don't want to see you get discouraged if you find the steering requires too much oomph.
Quote from Quick_Cal on November 23, 2022, 8:52 pm...got the car mounted to the bike ...way out of alignment.... may just take it all apart and start over.
Oh ya. I did take my dog for a ride around my front yard. He had a blast. His tail was wagging like crazy the whole time. That right there made it all worth while even if I never ride it again....
Off to a good start, Cal. Hang in there re: alignment -- it took us several attempts and adjustments to align one of our rigs, including taking it apart and starting over. Hope the dog continues to enjoy it -- pipe insulation around the cockpit may help help with the claws. And Drone's comments re: steering are accurate.
Lee
MB5+TW200+CRF250L+GTV300+INT650
XL883R w/Texas Ranger Sidecar
Zuma 50F + Burgman w/Texas Sidecar<Mrs. SwampFox
Keep in mind some pull right when on the throttle is normal as is pull left when braking. Of course how much depend on how hard you roll on or brake.
You can save you self a lot of head ache by finding a good flat road to test it on when setting up so you are not chasing ghost caused by the road.
Get the TOE set each adjustment you make can effect others go slow with changes
Thanks everyone!
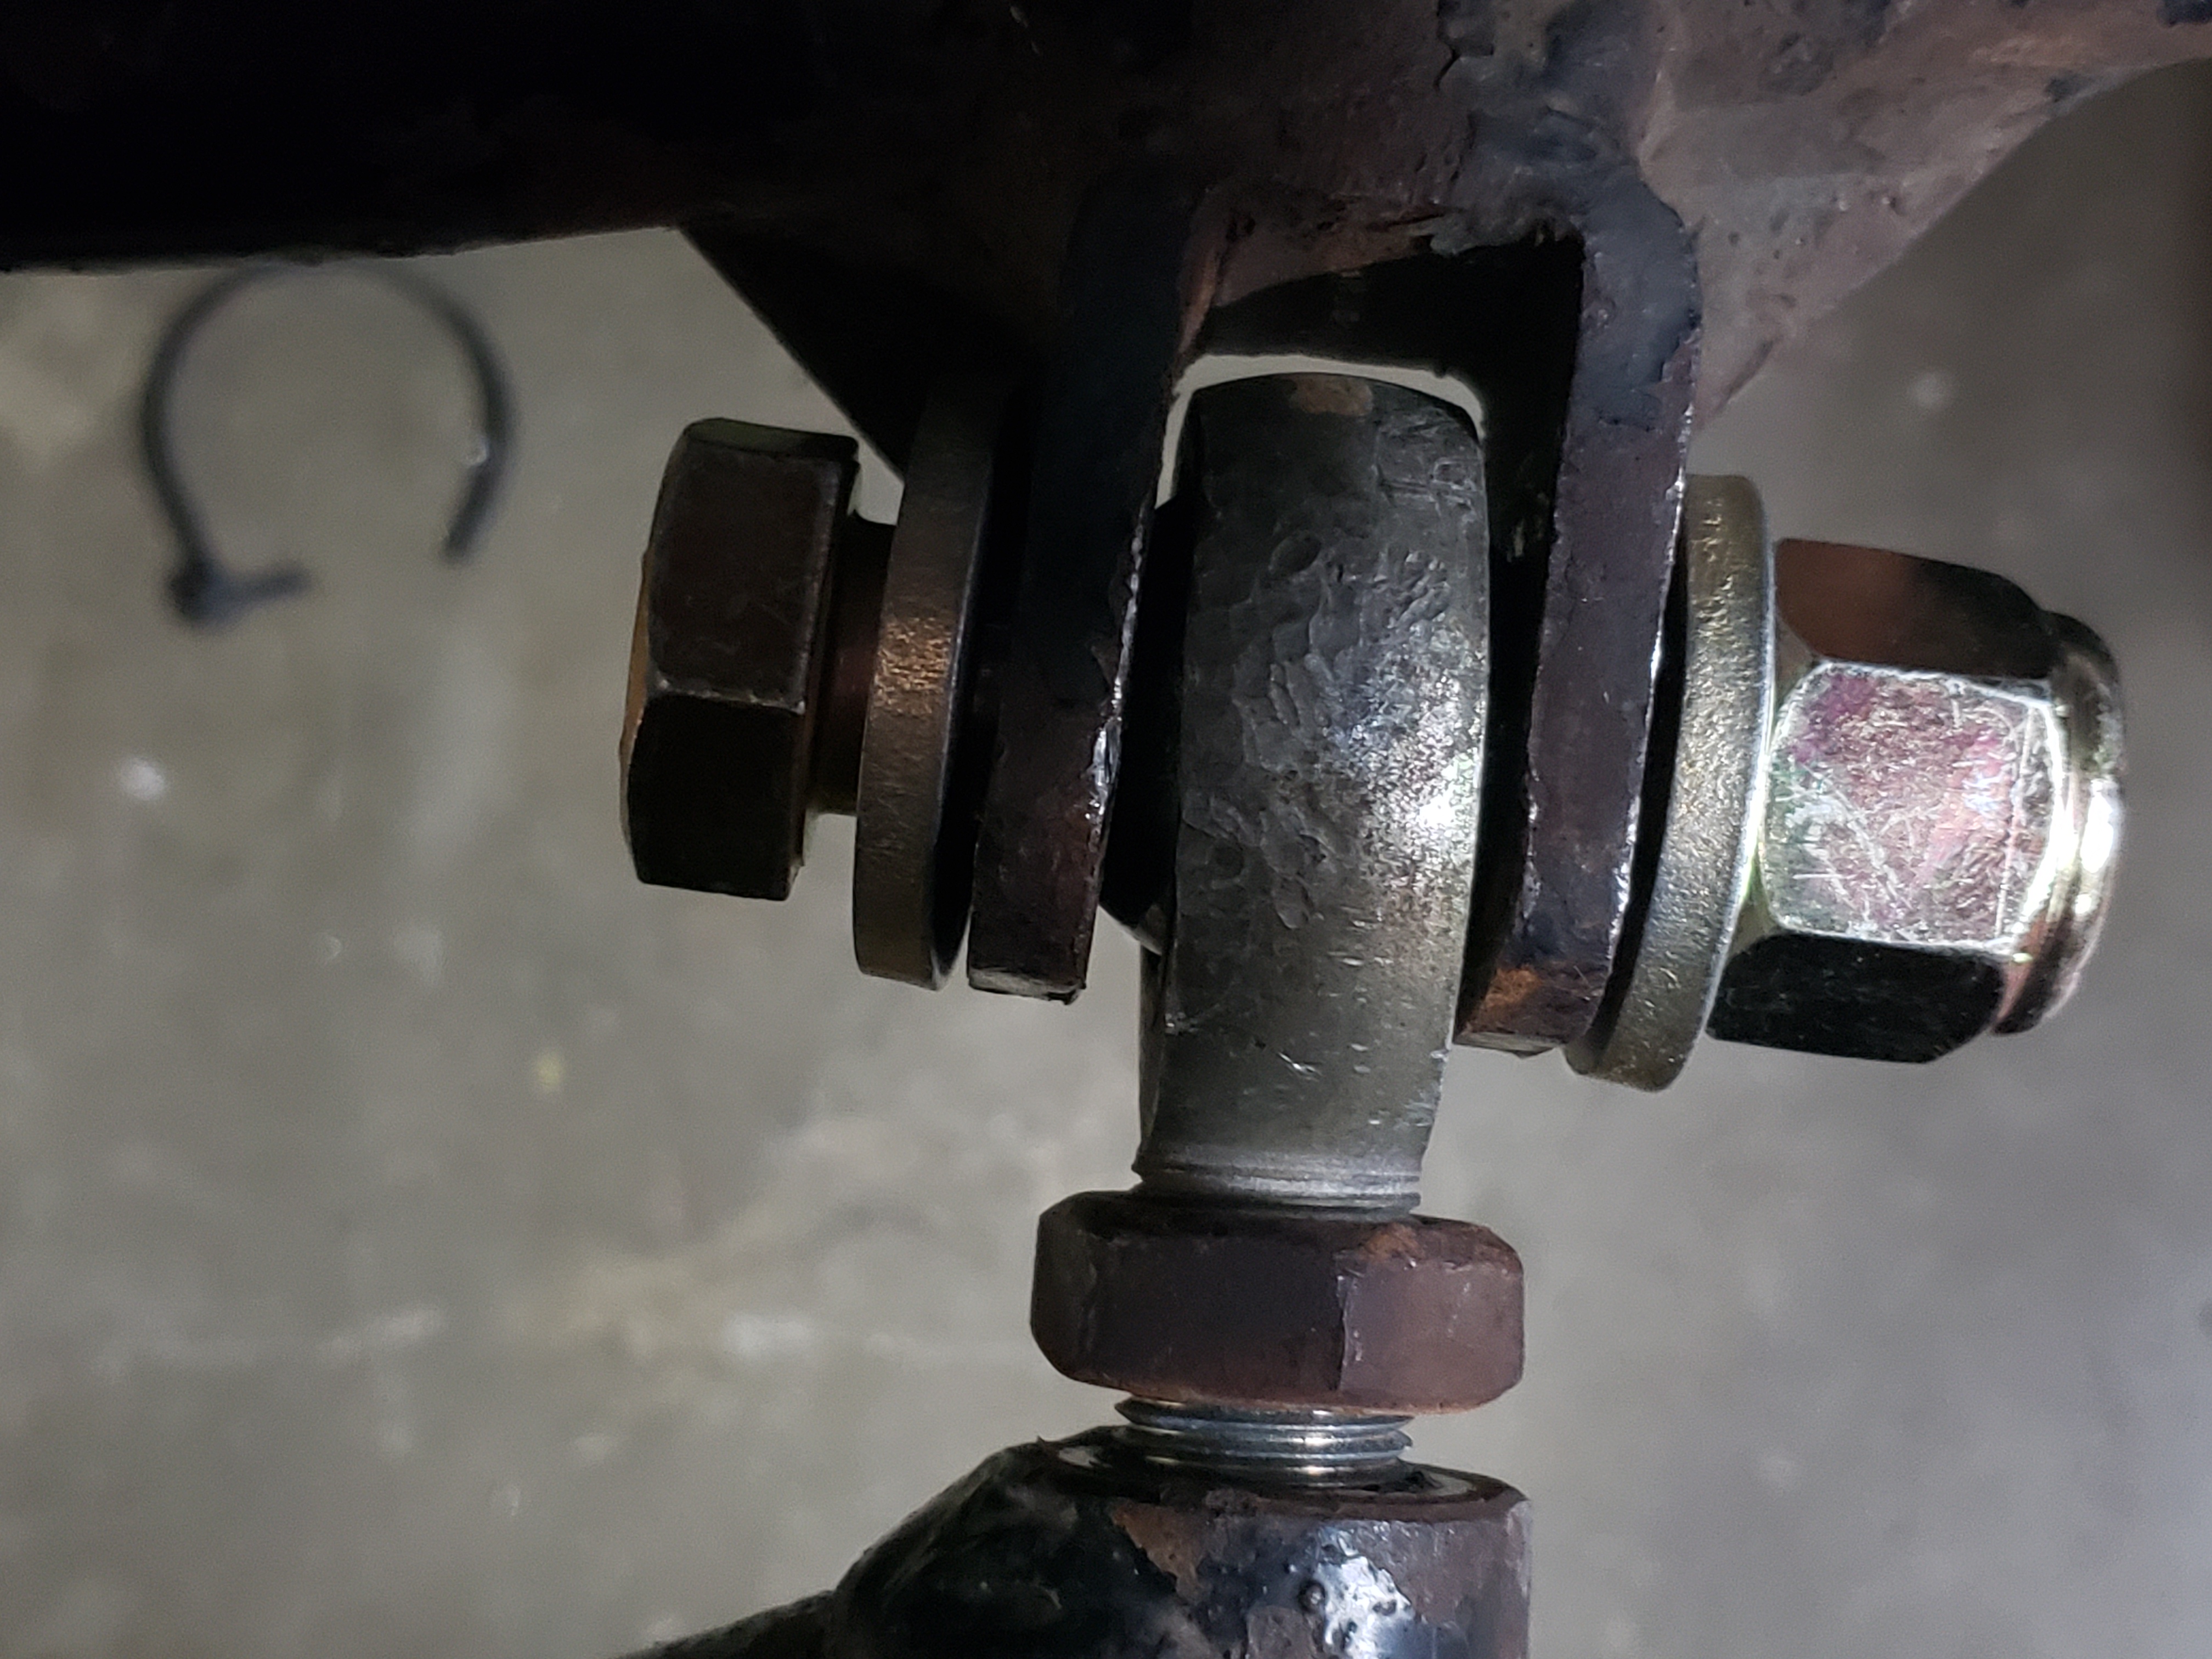
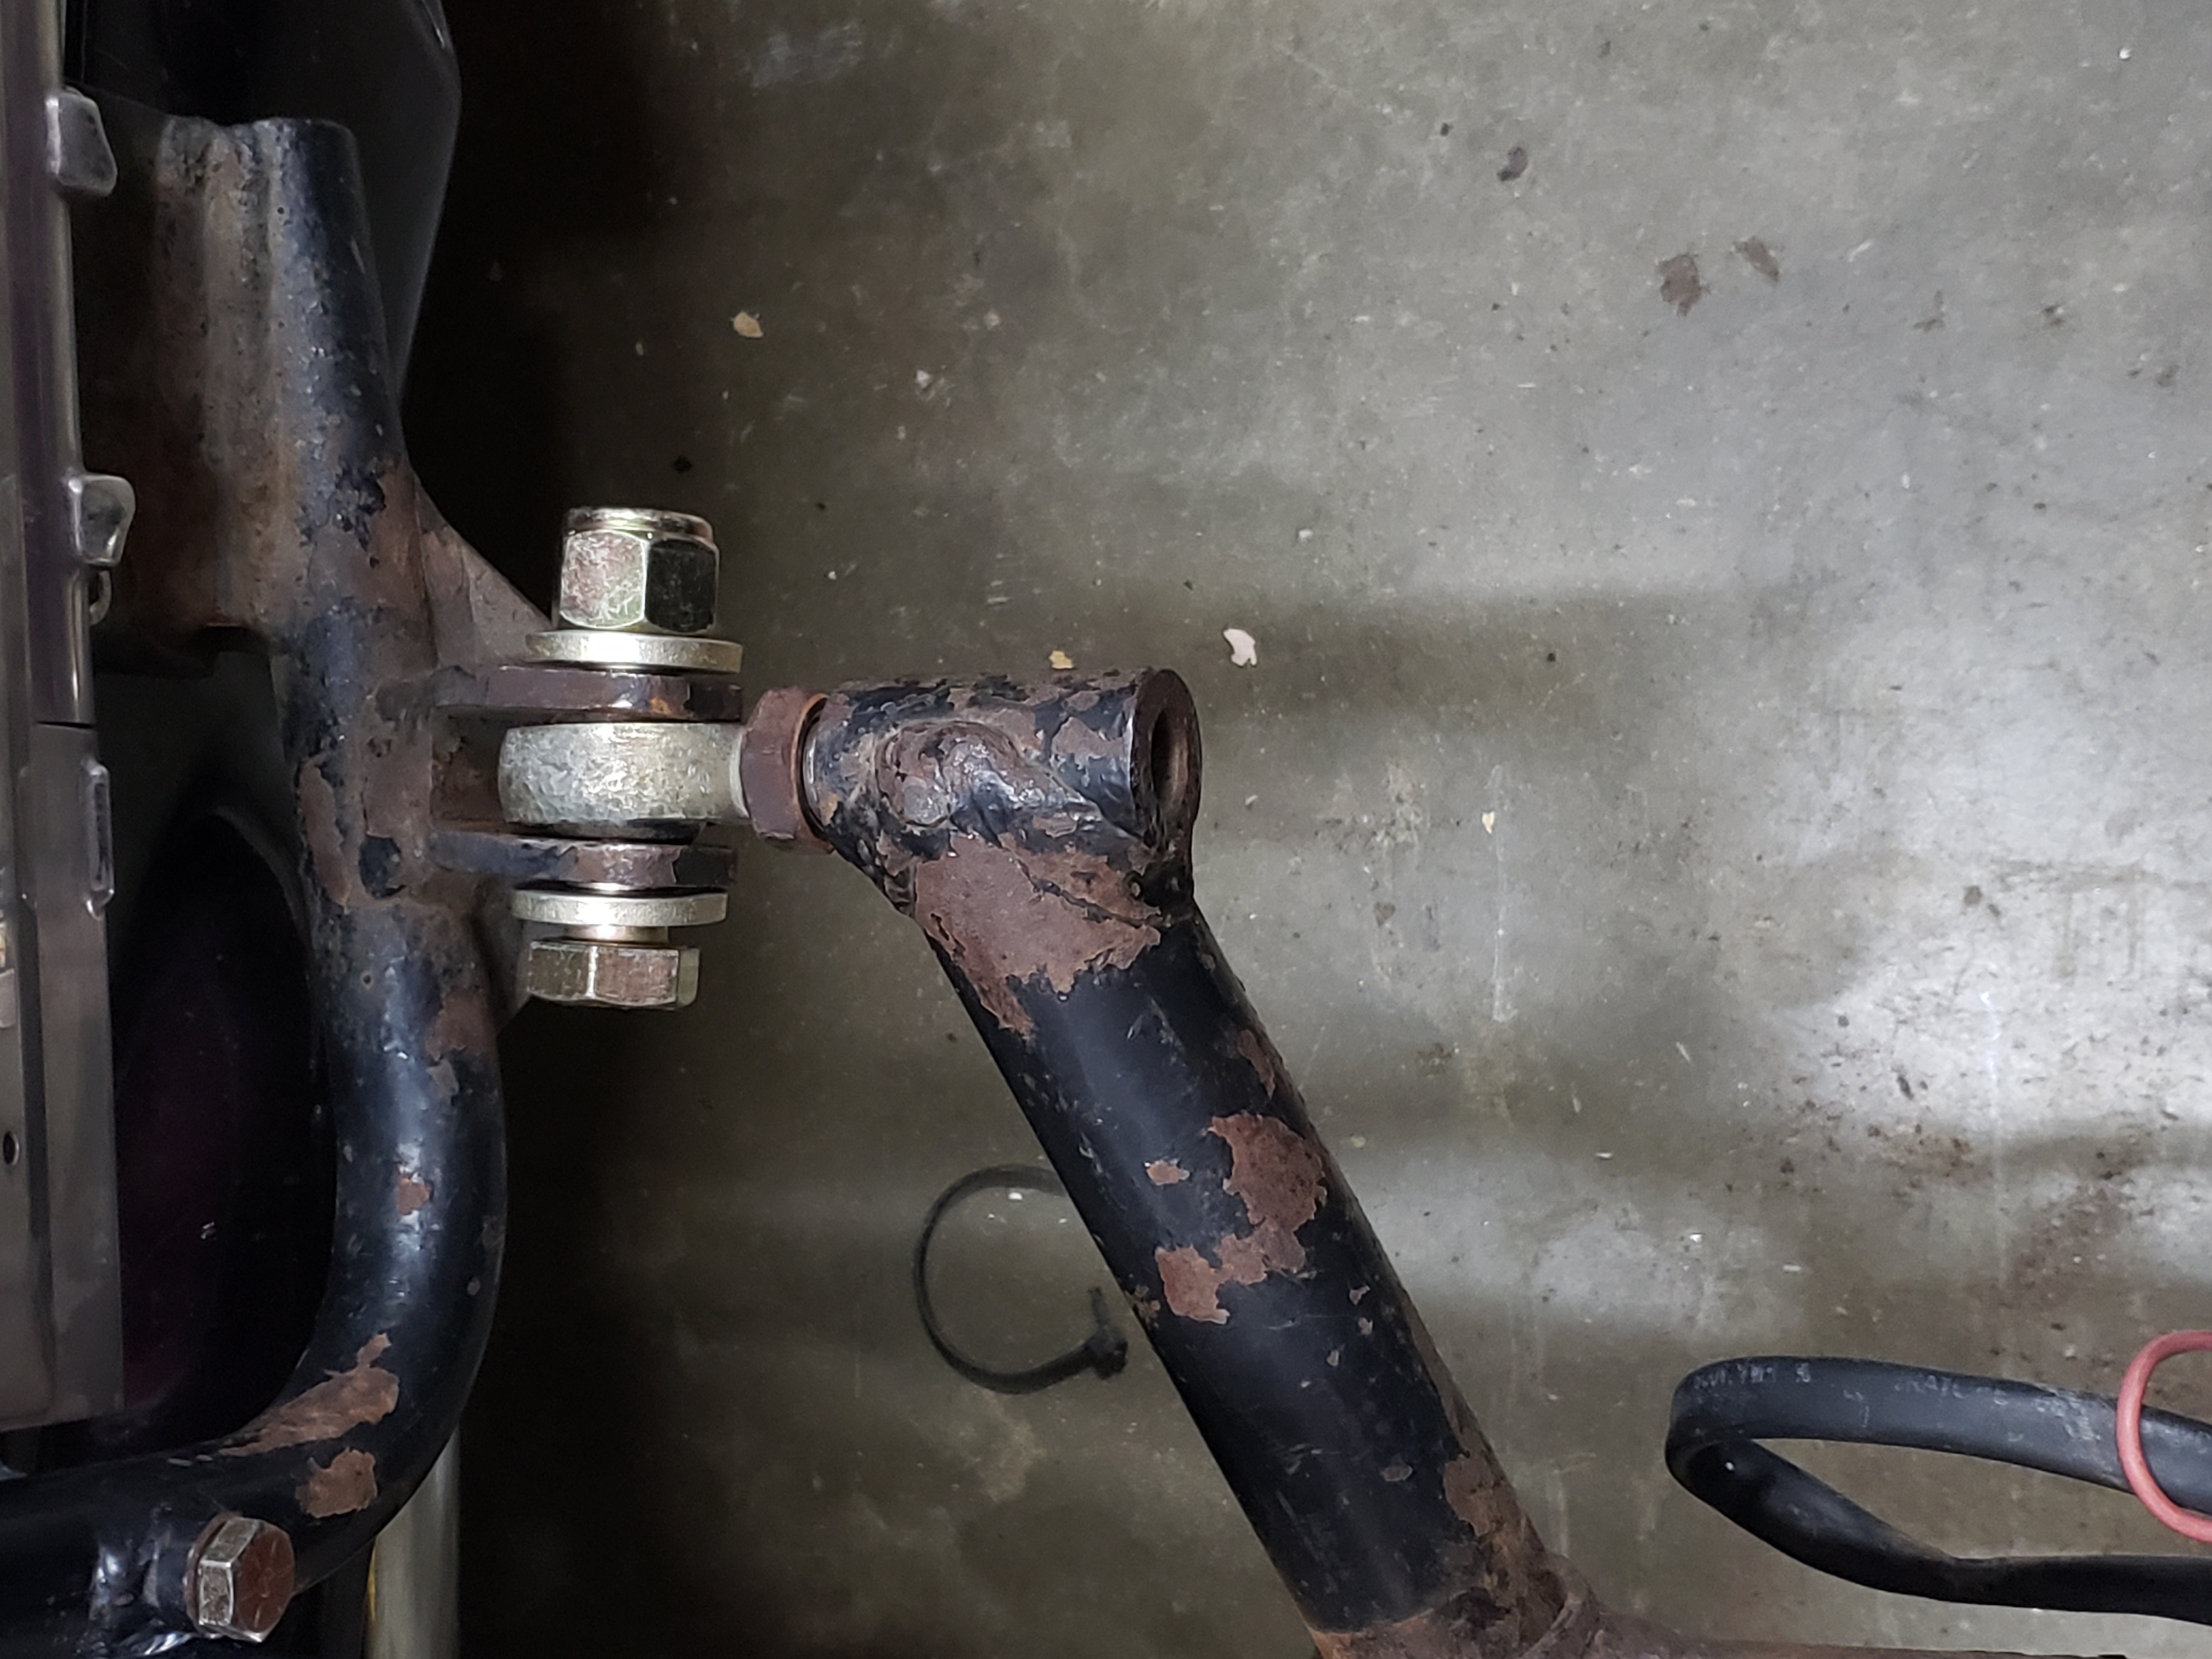
The main issue I'm having right now is there's something not right with the rear mounting bracket. I'm hoping it's user error on my part,,,lol. I will argue to my death that I installed it like the instructions said. I kept thinking this can't be right. And now looking at the sellers pics I can see it is not mounted the way he had it. This seller really saved my arse many times with his pics.
The problem is where the heim joint goes into the lower mount. The mount tabs are not perpendicular to the bike. They are angled back. This is making the heim joint way off and very hard to get in. This can't be right. But I think I know what the problem is. ME!!
So I'm going to pull the body off and start over. I probably need to look the frame over anyway. What sucks is the 2 install manuals I have counter dict each other. Both are from CSC. The parts they call for are different, and some of what I have doesn't match. For instance the 1500 parts list says I should have short struts. I have the long ones. One says I should have 45* clamps and bosses. The other says 70*. I have 70* stuff.
Ok. I gotta get this thing took apart,,,lol.
IMO working with body off is the way to go at first. get things close. But never attempt to install with out a coffee cup level.
Direction you have may not even be for what you have. Take you time it will come together.
Quote from FlyinMonkeys on November 24, 2022, 9:57 amCalvin Watson, depending on where you live, I would be more than happy to assist you with installing a trail reducing triple trees onto your Goldwing 1500, and any mechanical things you may need to address or consider regarding that bike.
Have you previously owned THAT bike for some time, or is that bike a new acquisition ? Have you owned a Goldwing 1500 before ?
I have installed trail reducing triple trees on Goldwings in the recent past, and they came out perfectly...makes a huge difference in how the bike steers.
And I am very knowledgeable about the Honda Goldwing, so don't hesitate to ask questions, or bounce thoughts off me.
So, young Calvin, where do you live ? Is you dogs' name...Hobbs ?
Oh, and a Happy Thanksgiving, or Happy Holidays, to one and all.
Ok. Here goes!!
I'm in the Metro St. Louis area. Where are you? And thanks for the offer to help. I may need it on this sidecar,,,lol. Triple trees are a looong way off though.
I've had this 1500 for a couple of years. I bought it non running for $500. It had some small wires burned up do to the po's work. I cut out the burned up wires and spliced in new one's. Then I fixed the original problem the guy was having. It started right up. I'm slowly going through it. I've rebuilt the air shock, brake caliper, new forks, and put on new tire's. Still lots to do. Rebuilding the carbs and master cylinders is high on the list.
I've rebuilt several motorcycles. I went through 2 1200 Goldwings. I restored a 73 Yamaha TX750. I loved that bike. Wished I still had it. And I've been restoring a 72 Yamaha XS650 for about the last 15 years,,,lol. Finally moved it out of the spare bedroom into the garage last year. Been working on a 72 Honda Z50 for about 6 years now,,,lol.
Can you see a pattern. I start projects but never seem to finish. But this sidecar is for my dog. He truly is the only reason I got it. He HAS to go on the road with me.
I'm 62. I beat cancer about 6 years ago. But the chemo messed my head up. I struggle with some of the simplest things. That's why I have such a hard time with some electrical stuff. I'm not as sharp as I used to be,,,lol. I'm now on disability and can't work. So I have lots of time for projects.
My goal in life is to travel the country on my Goldwing pulling my trailer. Now with this sidecar I can take my best bud with me.
Oh ya. My dogs name is Wilton. I have an old Wilton vise. I always said if I ever had another kid or dog, I would name him Wilton. But everyone calls him Willy. I might have to change his name to "Sidecar Willy".
I like making videos of my projects. You guys should check out my youtube channel. I work on all kinds of stuff. It's called "Quick Cals Garage".
Here's a video of when I first got this Goldwing and got it running.